Classy Flooring ATL

White Oak Herringbone with 7-Inch Custom Border — Buckhead High-Rise, Atlanta

A complete floor replacement on the 24th floor of a Buckhead condominium. Approximately 1,500 square feet of site-finished white oak herringbone with a 7-inch tongue-and-groove border, installed throughout the full residence over five weeks under HOA work-hour restrictions.

This Buckhead high-rise project is one of Classy Flooring ATL’s documented custom pattern installations — site-finished white oak herringbone, custom borders, and parquet work across metro Atlanta. See the full range of our work on our Our Work page.

The Client Situation

The project did not begin as a herringbone installation. The client originally contacted us to refinish the existing floor. After the on-site assessment, we explained that refinishing was not the right path — the floor had already been site-finished twice and could not support another proper refinishing cycle. The recommendation was to replace it.

Once that decision was made, the conversation shifted from saving the old floor to designing the right new one. After consultations, material reviews, and on-site mock-ups, the client chose a custom white oak herringbone with a border. The mock-ups were a working part of that process — they allowed the client to evaluate options at full scale and make a confident decision on the final border proportion.

The goal was not to replace what was there with something equivalent. It was to create a floor that was intentional, appropriate for the space, and built to last.

Project Constraints

The apartment is on the 24th floor of a Buckhead high-rise with active HOA requirements. Elevator scheduling, demolition timing, and material logistics all had to operate within the building’s rules.

The layout added another layer of complexity. A non-rectangular open-plan space requires careful planning before a herringbone pattern can be laid out — the geometry has to be worked out in advance so the pattern reads as balanced from every angle.

The apartment also houses a valuable art collection. Working around pieces of that value required a level of care that goes beyond a standard residential installation.

Before installation could begin, the subfloor required preparation. Without that foundation, the pattern could not have been executed correctly.

The Decisions That Defined the Outcome

The first critical decision came before a single board was installed — advising the client that refinishing was not the right solution, even though that was the original request. Agreeing to the wrong scope would have produced the wrong result regardless of execution quality.

Once the installation plan was set, subfloor preparation and border integration became the defining technical decisions. Subfloor preparation determined whether the pattern would hold its geometry over time. Border integration determined whether the result would read as a custom floor or a standard installation with a frame added as an afterthought.

On a project like this, those decisions are what separate a floor built for long-term performance from one that only looks right at first.

Project Specifications

  
LocationBuckhead high-rise condominium, 24th floor, Atlanta, GA
Project typeFull floor removal and replacement with site finish
Wood speciesWhite oak, unfinished
Board dimensions5 inches wide × 20 inches long
PatternHerringbone
Border7-inch tongue-and-groove border throughout the full residence
Total areaApproximately 1,500 square feet
SubfloorConcrete — ground and prepared for installation
Acoustic underlaymentRoberts Natural Cork, 6mm, adhered with Wakol MS 260
Installation adhesiveWakol MS 260
Finish systemLOBA Easy Prime sealer + two coats LOBA 2K Duo, satin
Sanding equipmentLägler Hummel belt sander, Super 7 edger, FG Floortec Discus planetary sander
First consultation to project startApproximately eight months
On-site durationFive weeks

Project Context

This project replaced the entire floor of a primary Buckhead residence. The existing floor was a dark-stained engineered hardwood, straight-lay, installed as a full-spread glue-down on concrete. It had been refinished twice previously. When water damage occurred, the remaining wear layer was no longer sufficient for another sanding cycle. Full removal and replacement was the correct decision.

The timeline from first consultation to the start of on-site work was approximately eight months. Part of that period involved documentation and multiple meetings to establish why the existing floor could not be refinished again. Once the replacement was confirmed, the project moved into material selection, layout planning, and scheduling.

The residence was not an empty space. The homeowners had an extensive art collection, floor-to-ceiling mirrors, and high-value furniture — several pieces of which could not be moved because of their size or fragility. Protection of those items was part of the project scope from the beginning.

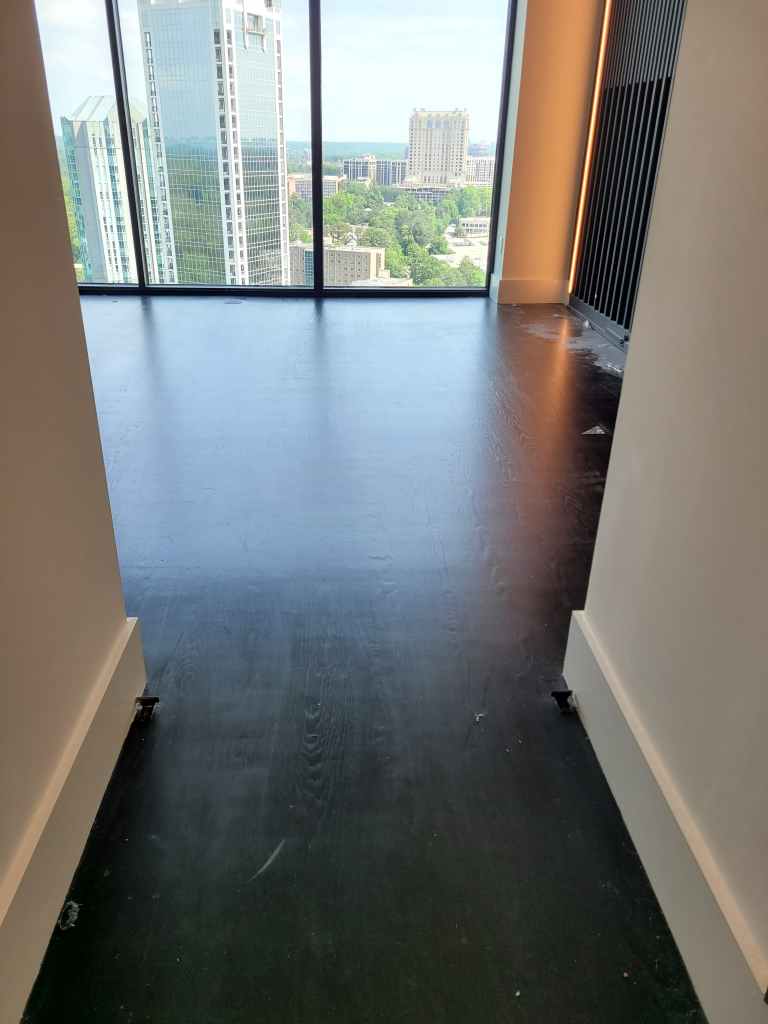
Existing dark-stained engineered hardwood floor in a Buckhead high-rise before replacement with custom herringbone.
Before: the existing dark-stained engineered hardwood floor, looking toward the city-view windows. This straight-lay engineered floor had been refinished twice and could not take another sanding cycle.
Existing dark-stained engineered hardwood in a Buckhead high-rise hallway before removal for white oak herringbone installation.
Before: the existing dark-stained engineered hardwood running down the hallway toward the windows. The same straight-lay floor carried through the full residence.
Existing dark-stained engineered hardwood in the main living area of a Buckhead high-rise before custom herringbone installation.
Before: the main living area at the windows, with the existing dark-stained engineered hardwood. This floor had been site-finished twice and could not take another refinishing cycle, which is why full replacement was the right call.
Existing dark-stained engineered hardwood running along the kitchen cabinetry of a Buckhead high-rise before removal for white oak herringbone installation
The kitchen of the Buckhead high-rise, looking along the cabinetry run before the floor was taken up. The existing dark-stained engineered hardwood was removed down to the concrete subfloor for the white oak herringbone installation.

Design Direction: Board Proportion and Border Width

The homeowners selected white oak and wanted a lighter floor in a herringbone layout. Two board-length options were presented for the selected 5-inch width: 20 inches (a 4:1 ratio) and 25 inches (a 5:1 ratio).

The 20-inch board was chosen based on proportion. In herringbone work, the length-to-width ratio affects how the pattern reads across a room. A 5:1 ratio is commonly referenced as a standard, but it is not universally correct. In this residence — with its ceiling height, open layout, and room dimensions — the 4:1 board produced a more balanced visual result. The pattern felt better scaled to the space. The clients saw both options and confirmed the 20-inch length.

The border width was also selected after reviewing multiple options. The final choice was 7 inches, installed throughout the full residence.

White oak herringbone material laid out in the Buckhead high-rise unit during an on-site review before installation
The white oak herringbone material laid out in the actual Buckhead high-rise unit during an on-site review before installation began. The dark floor underneath is the existing engineered hardwood, later removed for the new floor.

Existing Floor Removal

The existing engineered floor had been installed as a full-spread glue-down on concrete. The original adhesive had cured to an exceptionally hard bond. Standard removal equipment alone was not sufficient to extract the floor efficiently across 1,500 square feet.

The process required two stages. First, the floor was cut into small sections using a circular saw. Then a specialized floor-removal machine extracted the sectioned boards. Without pre-cutting, the adhesive bond resisted the machine and slowed progress significantly. Pre-cutting allowed sections to be lifted and separated systematically.

Demolition generated a large volume of debris before any subfloor work could begin. This was a full replacement, not a light tear-out.

Close-up of removed dark-stained engineered hardwood showing hard adhesive residue after demolition in Buckhead condo
Large pile of dark-stained engineered hardwood pieces after floor removal in Buckhead high-rise condominium
Demolished engineered hardwood floor debris bagged for removal after full floor replacement, Buckhead high-rise condo

Subfloor Preparation

Once the existing floor was removed, the concrete was assessed for flatness and surface condition. Herringbone installation requires a flatter substrate than straight-lay work. Because boards meet at an angle and the pattern runs uninterrupted across large areas, subfloor variation is more visible in the finished result. The NWFA standard for hardwood over concrete calls for a maximum variation of 3/16 inch over a 10-foot span.

After adhesive residue was removed, the concrete was measured across the full floor area. Several areas showed high points that exceeded the acceptable tolerance. These were corrected with an industrial concrete grinding machine — a dust-contained system that removed the high points mechanically.

After grinding, the concrete was within NWFA tolerance across the full surface. No self-leveling compound was required.

Industrial concrete grinding machine removing adhesive residue and high spots from the slab before herringbone installation.
The exposed concrete slab being ground to remove old adhesive residue and high spots. Herringbone needs a flatter substrate than straight-lay, so the slab was brought within NWFA tolerance — maximum 3/16-inch variation over a 10-foot span — before installation.

HOA Acoustic Requirement and Cork Underlayment

Gallery Condominiums requires acoustic underlayment beneath any hard-surface flooring. The building specifies a minimum Impact Insulation Class (IIC) rating of 65 or better. IIC measures structure-borne noise — specifically footfall transmission through the floor to the unit below. This requirement is mandatory for all hardwood installations in the building.

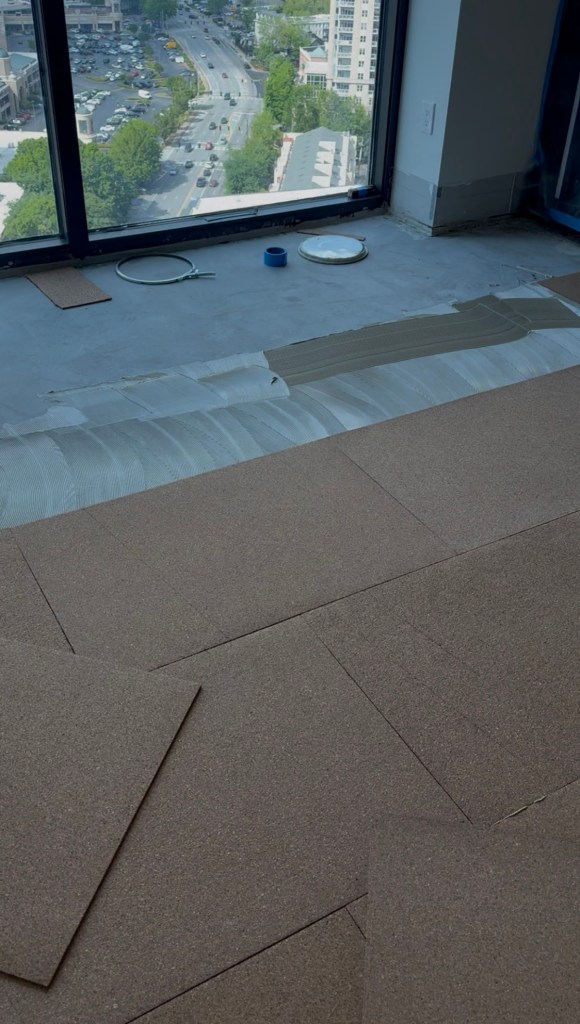
Roberts cork sheets were installed in panel form across the full floor area to satisfy this requirement. Cork was adhered to the prepared concrete using Wakol MS 260 — a silane-modified polymer adhesive applied with a notched trowel. Seams between panels were kept tight to maintain the acoustic performance of the system.

Wakol MS 260 bonds to concrete without a primer on properly prepared substrates, remains slightly flexible after cure, and produces low VOC levels during and after application.

Crew setting Roberts Natural Cork panels with Wakol MS 260 adhesive on the prepared concrete slab in a Buckhead high-rise.
Roberts Natural Cork panels, 6mm, set into Wakol MS 260 adhesive over the prepared slab. Gallery Condominiums requires an acoustic underlayment rated IIC 65 or better beneath any hard-surface floor, and seams were kept tight to hold that performance across the full area.
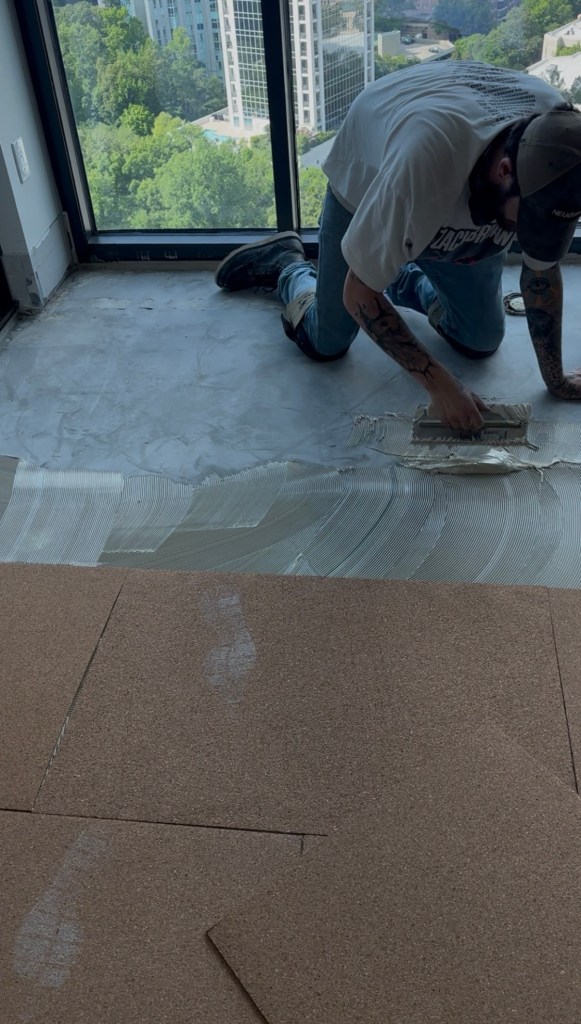
Crew setting Roberts Natural Cork panels with Wakol MS 260 adhesive on prepared concrete subfloor, Buckhead Atlanta
Crew adhering Roberts Natural Cork panels into Wakol MS 260 over the prepared slab in a Buckhead high-rise, near the window wall.
Cork installation in progress, working out from the window wall. Each 6mm panel is set into Wakol MS 260 with seams kept tight, so the acoustic layer stays continuous across the full floor before the herringbone goes down.

Layout Planning

Before any boards were glued down, the layout was established using a dry-lay method — boards set in place without adhesive to confirm the reference line and verify the visual result across the full floor.

The starting point was the entrance hallway. The herringbone was centered on the hallway’s long axis so the pattern would read symmetrically from the front door. The same principle carried into each bedroom: the main line was established along the longest axis of the room, and installation built outward from there.

The entire residence was installed in one consistent herringbone direction throughout. This continuity allows the floor to read as a single unified material across all spaces rather than a series of separate rooms.

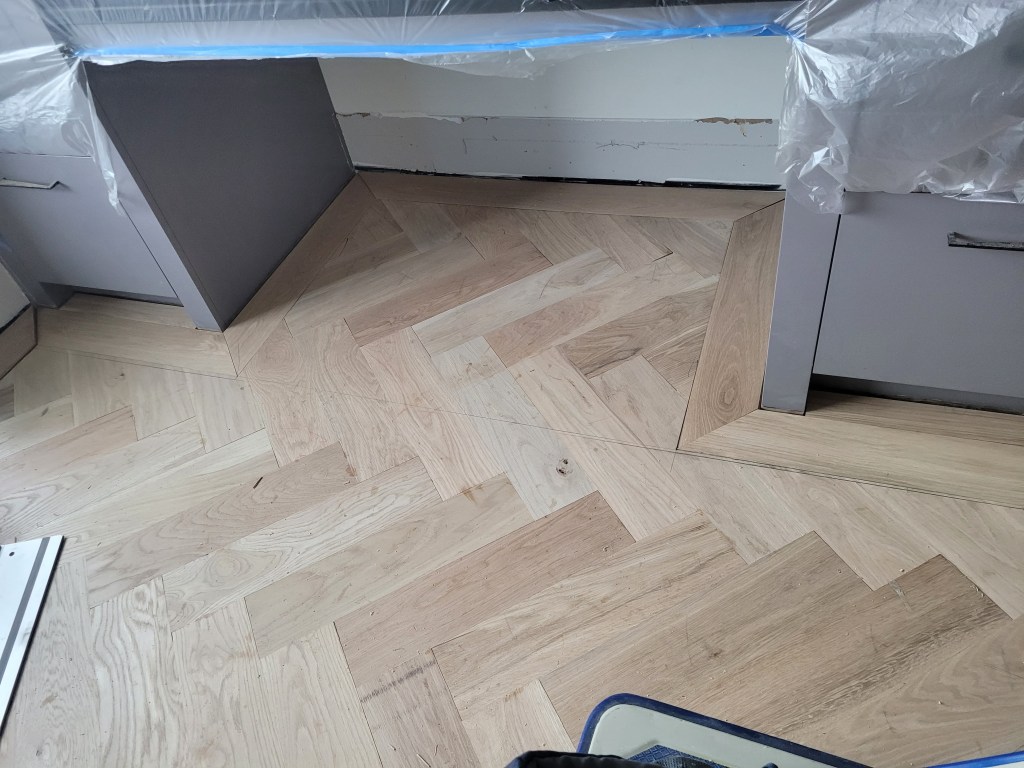
The most technically demanding layout area was the kitchen. Its non-rectangular footprint, combined with the offset position of the refrigerator and dishwasher relative to the surrounding cabinetry, required careful planning to ensure both the herringbone pattern and the 7-inch border landed correctly at every wall and fixed element.

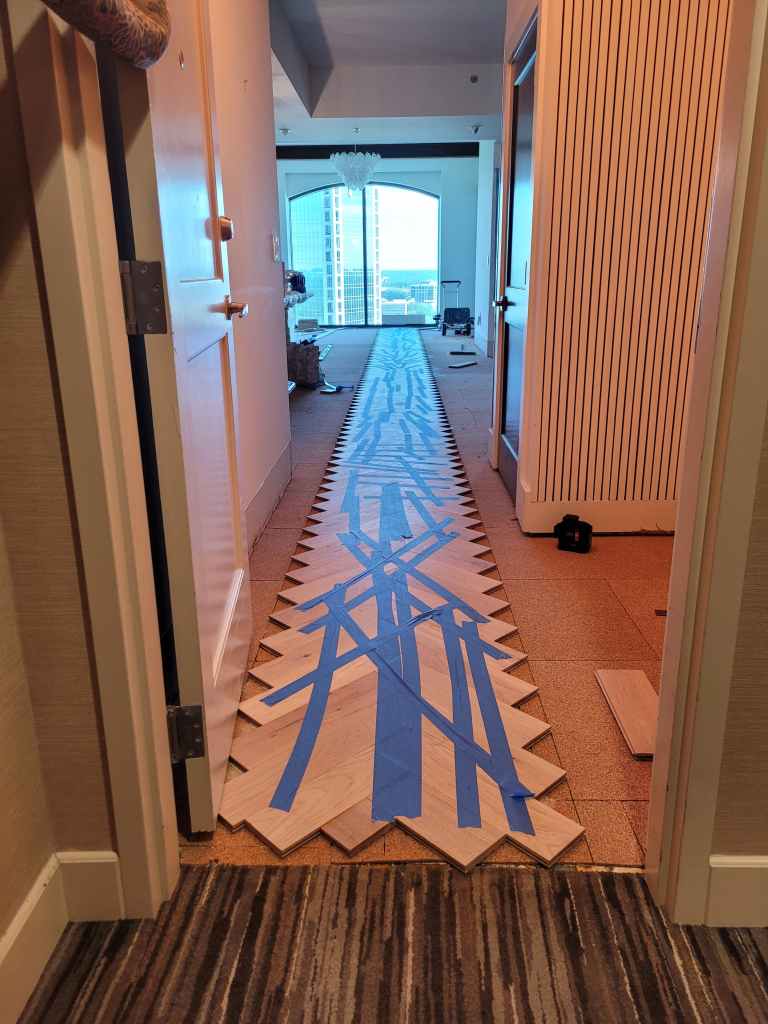
Dry-lay center line for the white oak herringbone marked with blue tape down the Buckhead high-rise hallway.
The herringbone center line set out on the hallway's long axis, marked with blue tape. Boards are dry-laid without adhesive first to confirm the reference line and check how the pattern reads down the full length before anything is fixed in place.
White oak herringbone center line dry-laid and taped along the full hallway length in a Buckhead high-rise.
The center line carried the full length of the hallway. It was set on the hallway's long axis so the pattern reads symmetrically from the front door, and the same principle was used in each room — main line along the longest axis, building outward from there.
White oak herringbone center line set over cork in the second bedroom of a Buckhead high-rise, taped along the room's long axis.
The center line carried into the second bedroom, set along the room's longest axis over the cork. Each room started the same way — main line first, then building outward — so the herringbone runs in one continuous direction across the whole residence.

Installation

The herringbone boards were installed with Wakol MS 260, full-spread, applied with a notched trowel. The installation sequence was the same in every section of the floor: set the main line, allow it to cure fully, then proceed outward.

After the center-line boards were set, blue painter’s tape was applied across joints to hold the boards in position during the initial cure. Work then paused for one full day before expanding outward. This pause allows the adhesive beneath the reference line to reach sufficient strength so those boards cannot shift when adjacent boards are pressed into place. On pattern work, the center line controls everything that follows. A stable reference protects the layout as the floor expands outward across the room.

After the center line cured, installation proceeded in both directions simultaneously. Blue tape was applied across joints throughout and removed after each section cured.

Herringbone was installed throughout the full residence in a single consistent direction:

  • Main living and dining area
  • Kitchen
  • Primary hallway and connecting corridors
  • Primary bedroom
  • Second bedroom
  • Office
  • All transition zones between rooms
White oak herringbone center line dry-laid in the primary bedroom of a Buckhead high-rise, taped along the room's long axis.
The center line set in the primary bedroom along its longest axis. Once the line cured, installation built outward from it in both directions — the line controls the geometry of everything that follows, which is why it's set and allowed to hold before the rest of the room is laid.
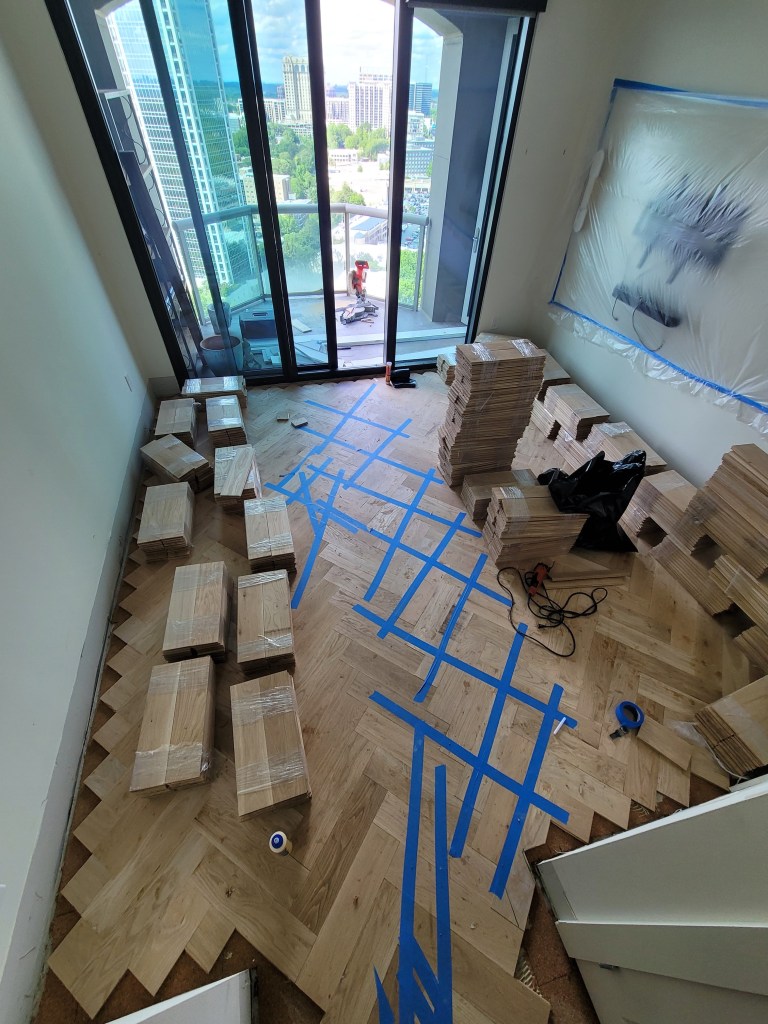
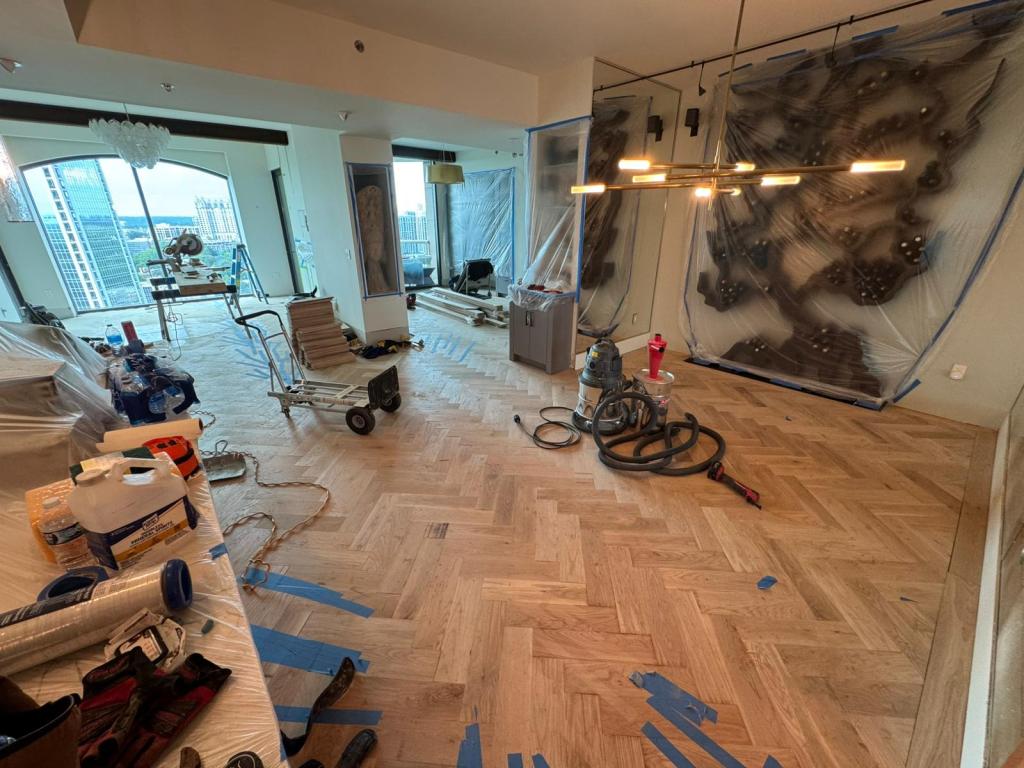
White oak herringbone installation in progress in a Buckhead high-rise, boards set with staged material along the window wall.
Installation in progress after the center line cured. Boards were set in full-spread Wakol MS 260 and expanded outward in both directions, with blue tape holding each section during the adhesive's initial cure.
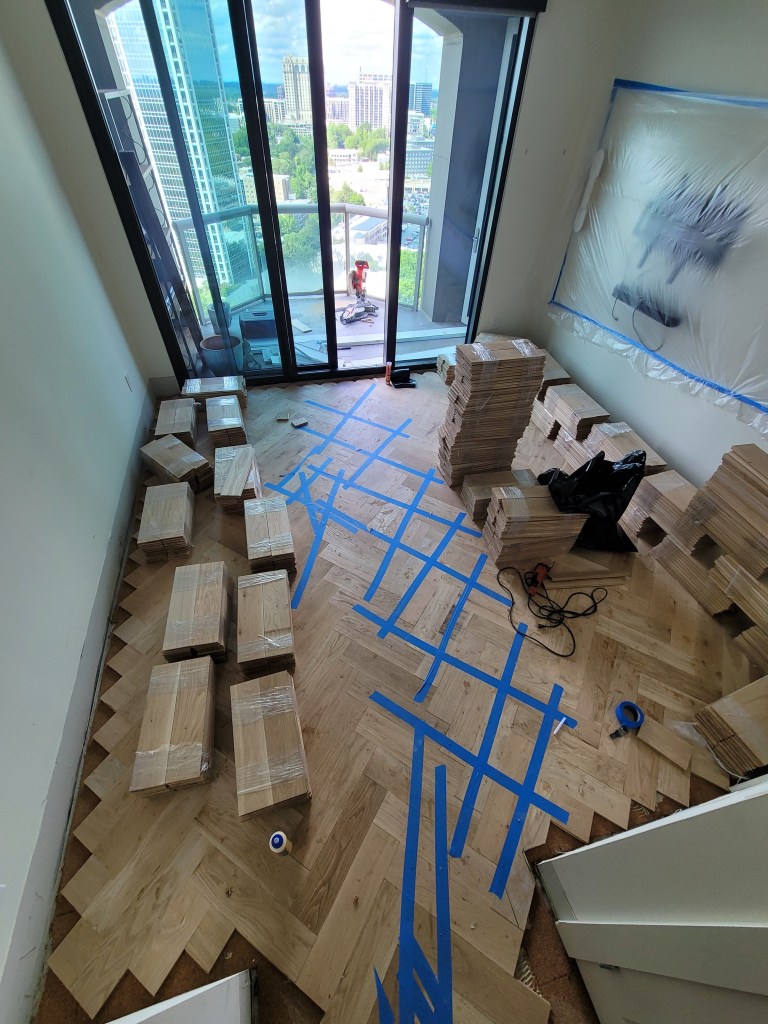
White oak herringbone installation in progress in a Buckhead high-rise room, boards expanding outward with staged material and blue tape.
Installation continuing through the rooms — boards set in full-spread Wakol MS 260 and worked outward from each room's center line, with blue tape holding sections during the initial cure and removed once each section set.
White oak herringbone installation in progress in the office of a Buckhead high-rise, boards expanding outward with blue tape.
Installation reaching the office, where the herringbone continues in the same direction as the rest of the residence. Boards were set in full-spread Wakol MS 260, worked outward from the center line, and held with blue tape during the initial cure.

Border and Transition Work

Tongue-and-Groove Construction

The 7-inch border was built using tongue-and-groove joinery throughout — not adhesive bonding alone. This is a deliberate technical choice.

A border attached only with adhesive relies entirely on the glue to hold the joint between the field and the perimeter over time. As wood expands and contracts seasonally, that stress concentrates at the glue line. Tongue-and-groove joinery adds a mechanical lock: the tongue of the border piece fits into the groove of the adjacent field board, creating a connection that resists movement in both directions. The border remains integrated with the field floor not only when freshly installed but over years of normal use.

The Milwaukee router was used to cut the tongue-and-groove profile into the border pieces, ensuring a consistent, tight fit throughout.

Corner Work

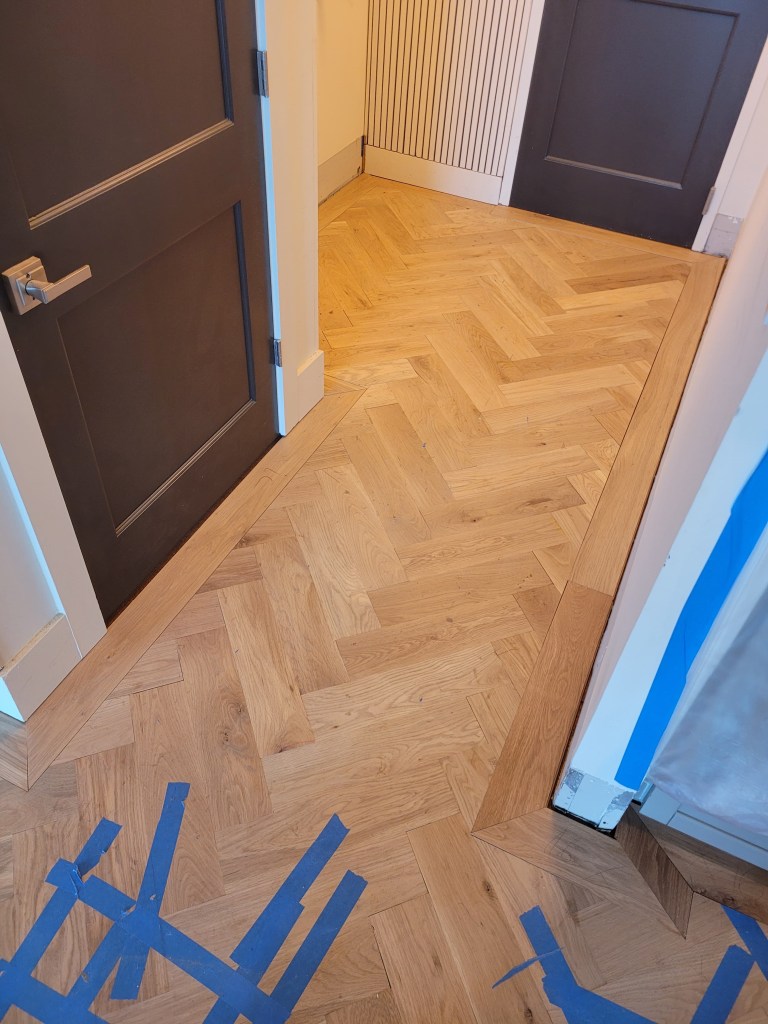
Every corner where two border pieces meet was cut at 45 degrees. This miter produces a joint that reads as seamless — the grain direction shifts at the corner in a way that looks intentional rather than structural. Every corner in this project was mitered. In person, the border reads as a continuous frame around each room rather than assembled pieces.

The border was installed in every room of the residence — main living area, kitchen, bedrooms, office, and all connecting corridors.

White oak tongue-and-groove border meeting the herringbone field in a Buckhead high-rise, mitered corner detail.
The 7-inch border built with tongue-and-groove joinery, not adhesive alone. The tongue of the border locks into the groove of the field board, so the connection resists seasonal movement in both directions and stays integrated over time. Corners were mitered at 45 degrees throughout.
White oak 7-inch border running along the kitchen cabinetry base in a Buckhead high-rise, fitted to the herringbone field.
The 7-inch border carried around the kitchen, fitted where the herringbone meets the cabinetry. The kitchen's non-rectangular footprint and offset appliances meant the pattern and border had to be planned so both landed correctly at every wall and fixed element.
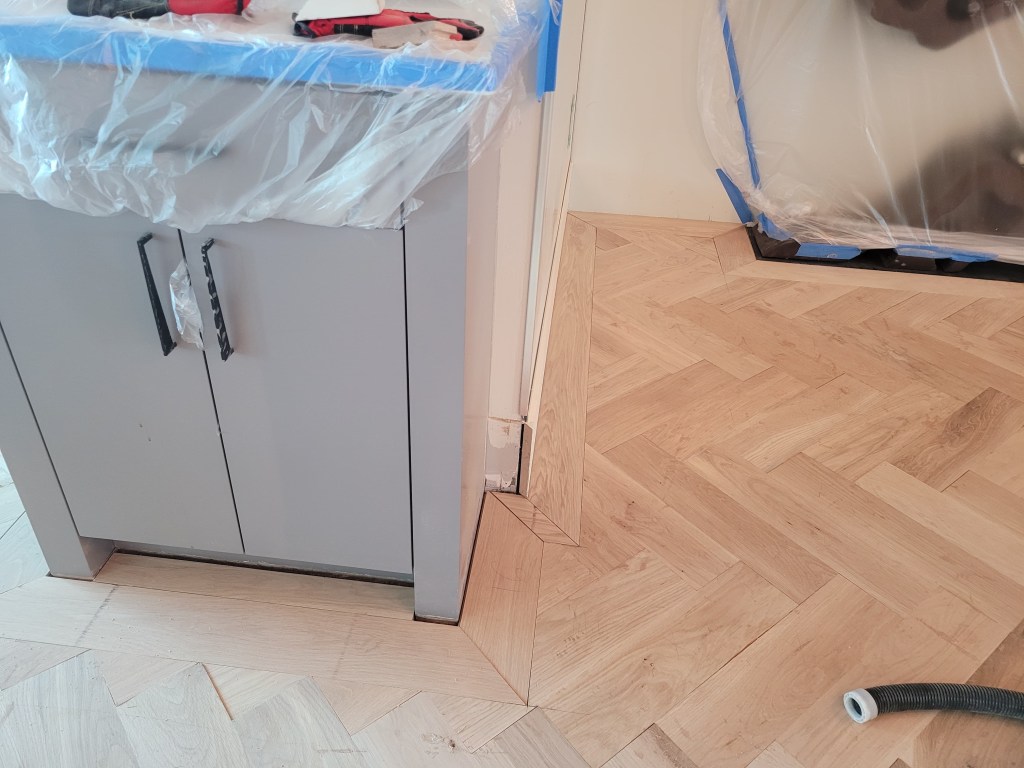
White oak herringbone and 7-inch border at the entrance of a Buckhead high-rise, fitted to the doorway.
The herringbone and 7-inch border at the entrance, where the pattern reads from the front door inward. The border frames the field as a continuous perimeter rather than a separate element added around the edge.

Custom Fitting Around Fixed Elements

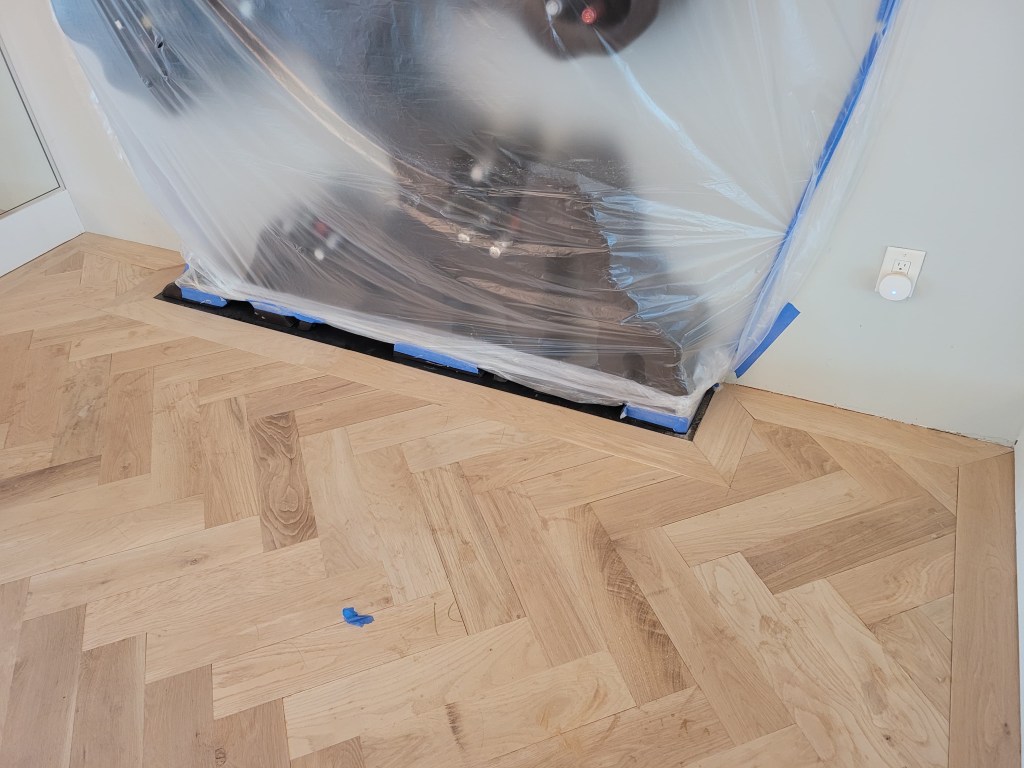
A large floor-level sculpture, commissioned from a sculptor for this apartment, could not be moved because of its size and fragility. The existing floor was removed carefully around it in small controlled sections. The new herringbone and border were then fitted precisely at the base of the piece so the finished result reads as part of the continuous floor design. The border at that location is indistinguishable from the border anywhere else in the room.

The floor-to-ceiling mirrors required careful handling throughout both demolition and border installation. Work in those areas was done at a measured pace.

Large artwork wrapped in protective plastic with the white oak herringbone and 7-inch border fitted around its base, Buckhead high-rise.
A large piece of art that could not be moved because of its size and fragility. The existing floor was removed around it in small, controlled sections, and the new herringbone and border were fitted at its base — so the border there is indistinguishable from the border anywhere else in the room.

Custom Transitions

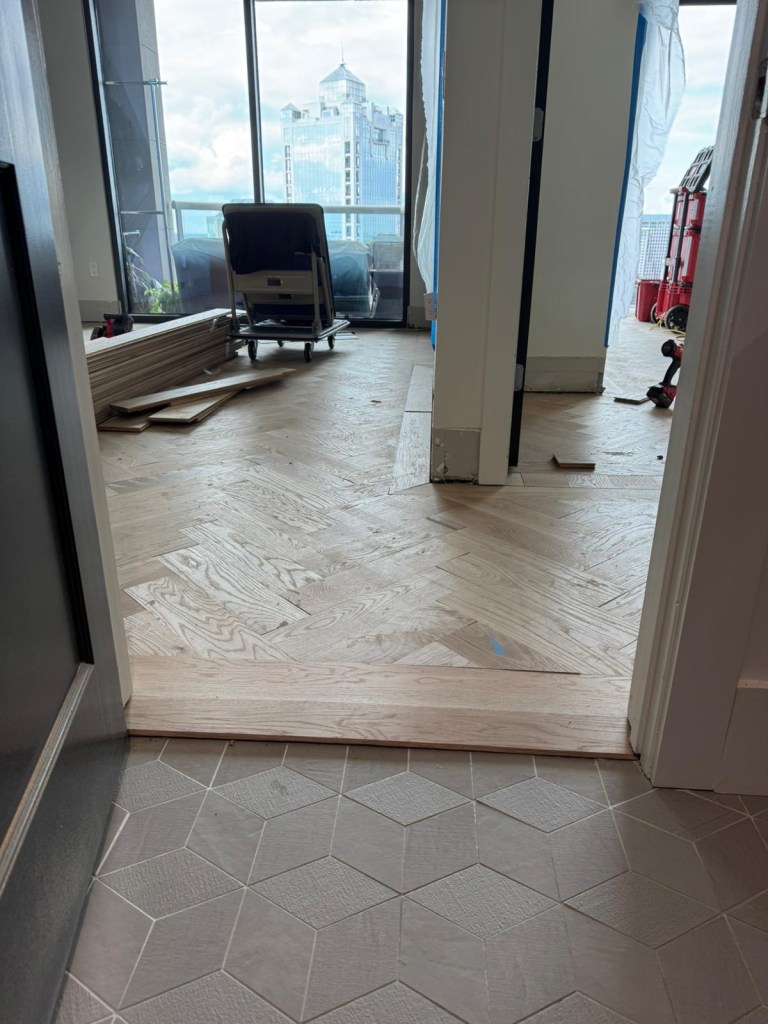
Every doorway in the residence received a custom wood threshold, built on site. Each one is tongue-and-groove connected at the field edge, so the mechanical joint carries the seasonal movement between the threshold and the herringbone field.

At the primary bedroom doorway the threshold is patterned, built from small boards set in varying grain directions. Grain direction governs how a wood surface returns light: boards running the same way read as one continuous plane, while a board turned against its neighbor catches the light differently. Setting small pieces in alternating directions gives each one its own tone as you move past it, so the threshold registers as a deliberate detail where the herringbone meets the doorway. The satin LOBA finish carries that variation across the piece.

Custom white oak transition at a bathroom threshold in a Buckhead high-rise, small boards arranged in varying grain directions.
A custom white oak threshold at the doorway where the herringbone field meets the tile, tongue-and-groove connected at the field edge so the joint holds with the floor.
Close-up of white oak border and custom transition joinery meeting the herringbone field at a threshold, Buckhead high-rise.
The patterned threshold where the herringbone field meets the opening, built from boards run across the doorway against the 45-degree grain of the field on either side. The change in grain direction is what makes the threshold read as its own element, tongue-and-groove connected at the field edge so the mechanical joint carries the movement between the two.
White oak custom transition where the herringbone field meets the border at a room threshold, Buckhead high-rise.
The herringbone field meeting the custom transition and border at a threshold, tongue-and-groove connected at the field edge so the junction stays integrated with the floor.
White oak custom transition between rooms in a Buckhead high-rise, herringbone meeting the border at the threshold.
A threshold between rooms, the herringbone field tongue-and-groove connected to the border at the opening so the mechanical joint carries the movement across the junction.

Sanding and Finishing

Sanding: Belt Sander, Edger, and Planetary Refining

The floor was sanded using the full sequence: a Lägler Hummel belt sander and a Super 7 edger for the cutting and leveling passes at grits 40, 60, and 80, followed by an FG Floortec Discus planetary sander for the refining passes at grits 100 and 120.

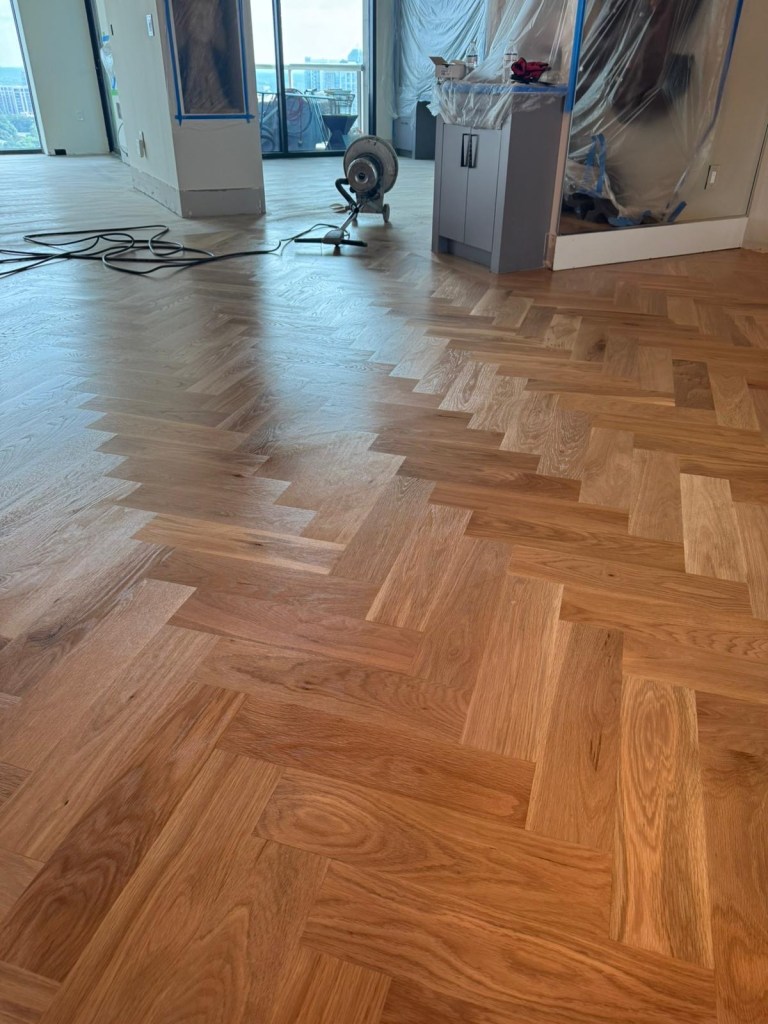
The belt sander and edger remove stock and flatten the field and perimeter. The planetary sander makes the final passes. Its discs rotate in multiple directions at once, so the cut is not aligned to any single board direction. On a herringbone floor, where boards run two ways, the scratch left by the final grit is what shows through the finish — so making those last passes with a multi-directional planetary keeps the surface even across both directions of the pattern. Field and edge were carried through the same grits so the open floor and perimeter read consistently before any finish was applied. The full progression followed NWFA standards.

FG Floortec Discus planetary sander on the white oak herringbone floor in a Buckhead high-rise.
The FG Floortec Discus planetary sander making the refining passes at grits 100 and 120. Its discs rotate in multiple directions, so the final cut isn't aligned to any single board direction — which is what keeps the surface even across both directions of the herringbone before finish.

Finish System: LOBA Easy Prime + LOBA 2K Duo, Satin

After sanding, one coat of LOBA Easy Prime sealer was applied across the full floor. LOBA Easy Prime penetrates the wood fiber and closes the grain before the finish coats are applied. This is important for achieving consistent sheen and color across the full surface — particularly on white oak, where open grain can produce variation in finish absorption if the wood is not sealed first.

After the sealer cured, two coats of LOBA 2K Duo were applied at the manufacturer’s specified intercoat interval. LOBA 2K Duo is a two-component waterborne polyurethane finish. The base and hardener are mixed on site before application and applied with a roller across the field and a brush at edges and border detail. The finish system was applied per the manufacturer’s technical data sheet throughout.

  
Coat 1LOBA Easy Prime sealer
Coat 2LOBA 2K Duo, satin
Coat 3LOBA 2K Duo, satin
Product typeTwo-component waterborne polyurethane
ApplicationRoller application for field, brush for edges and border
Intercoat intervalMinimum 3 hours at 68°F / 50% relative humidity
Full cureApproximately 7 days
VOCLow — no forced ventilation required during or after application

Because LOBA 2K Duo is a low-VOC product, windows did not need to be opened during application. In a high-rise environment where protected furnishings, artwork, and mirrors remained in the residence, this was a meaningful advantage.

Dust-contained sanding of the white oak herringbone floor in a Buckhead high-rise, with artwork wrapped and protected nearby.
The sanding phase performed with a dust-contained system, with the artwork and furnishings that stayed in the residence wrapped and protected throughout. Containing dust at this stage mattered with valuable pieces remaining in the unit.
White oak herringbone floor during dust-contained sanding in a Buckhead high-rise.
The herringbone field during sanding. The floor was carried through the full grit sequence — the belt sander and edger at the coarse grits, then the FG Floortec Discus planetary at 100 and 120 — so the surface reads evenly across both directions of the pattern.
Second coat of LOBA 2K Duo being applied to the white oak herringbone floor in a Buckhead high-rise.
The second coat of LOBA 2K Duo going down over the sealed floor. The two-component finish was applied with a roller across the field and a brush at the edges and border, per the manufacturer's data sheet — a low-VOC system, so the unit didn't need to be ventilated with furnishings and art still in place.

HOA Logistics and Site Management

On-site work was restricted to 9:00 AM to 4:00 PM on business days. The building’s service elevator had to be reserved in advance for material deliveries and debris removal each day. Work required coordination with other trades active in the building during the same period.

Operating within those restrictions across a five-week schedule — covering demolition, grinding, cork installation, full herringbone installation, border work, and multi-coat finishing — required precise daily planning.

The clients relocated to another unit in the same building during the project and were present almost every day to follow the progress.

Site Protection and Final Cleaning

Furniture that could be moved was removed before work began. Items that could not be moved — large mirrors, the floor-level artwork, and several oversized furniture pieces — were wrapped in heavy plastic sheeting secured with blue tape throughout the project. The sheeting protected surfaces from dust and debris without marking wall paint or mirror frames.

During the demolition phase, airborne dust could not be fully contained — this is unavoidable when removing a full-spread glue-down floor at this scale. The sanding phase was performed with a dust-contained system.

Before the clients moved back in, Classy Flooring ATL arranged a professional deep cleaning of the full residence at no charge. The home was returned in clean, move-in condition.

Result

The project was completed in five weeks. The clients had expressed concerns at the outset about the disruption to their home and the handling of the art and mirrors that remained in place. After returning, they said the outcome was worth the difficulty of the preparation period and that Claudiu had made the process as manageable as possible.

The relationship continued after the project was complete. The clients referred Classy Flooring ATL to other residents in their building and to friends.

White oak herringbone floor with custom border — Buckhead high-rise condo, Atlanta
Custom white oak herringbone installation with integrated border for a Buckhead high-rise residence.
Finished white oak herringbone floor with a 7-inch tongue-and-groove border in the open living and kitchen area of a Buckhead high-rise, site-finished
The finished white oak herringbone in the open living and kitchen area of the Buckhead high-rise. The 5-inch boards were laid in a herringbone field framed by a 7-inch tongue-and-groove border and finished on site with the LOBA system.
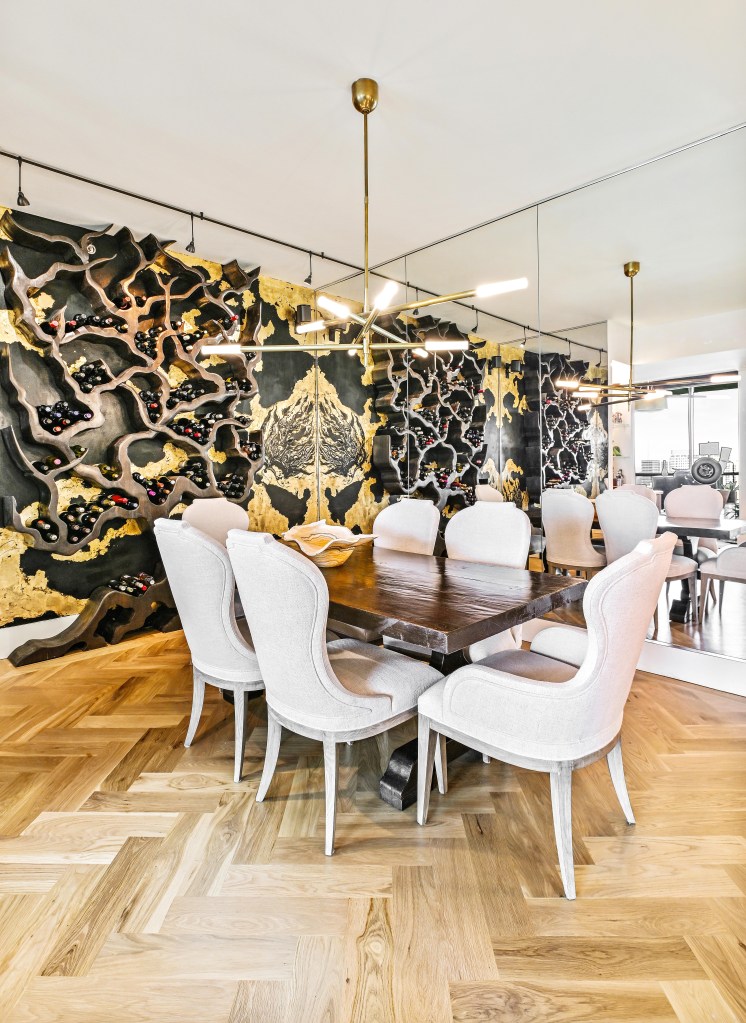
Finished white oak herringbone floor with a 7-inch tongue-and-groove border in the dining area of a Buckhead high-rise, site-finished
The finished white oak herringbone in the dining area of the Buckhead high-rise. The 5-inch boards run in a herringbone field framed by a 7-inch tongue-and-groove border, finished on site with the LOBA system.
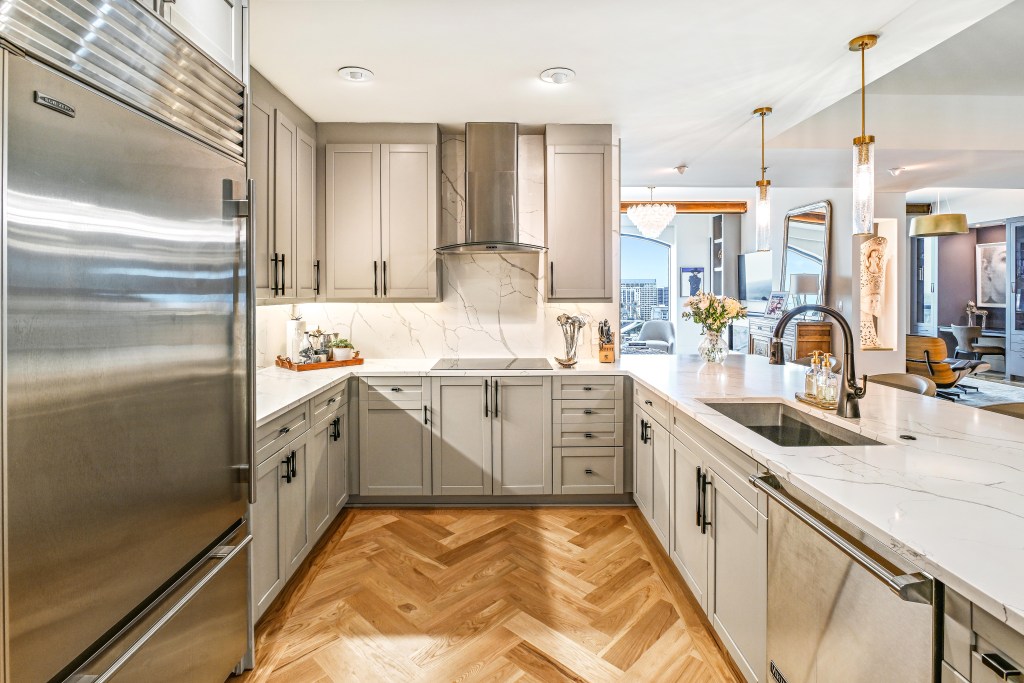
Finished white oak herringbone floor running through the kitchen of a Buckhead high-rise, Atlanta.
The finished kitchen, where the herringbone and 7-inch border had to land correctly against the cabinetry, island, and offset appliances in a non-rectangular footprint. The floor runs in the same continuous direction as the rest of the residence.
Finished white oak herringbone floor with 7-inch custom border in the dining area of a Buckhead high-rise, Atlanta.
The finished dining area — site-finished white oak herringbone with the 7-inch border running as a continuous frame around the room. The satin LOBA finish reads evenly across both directions of the pattern.
Finished white oak herringbone floor running continuously through the open kitchen and living area of a Buckhead high-rise, Atlanta.
The herringbone running in one continuous direction across the open kitchen and living area, so the connected spaces read as a single unified floor rather than separate rooms. The 7-inch border frames the perimeter throughout.

Photography: Zachary Toth

Complete Technical Reference

Demolition

  • Existing floor: dark-stained engineered hardwood, straight-lay, full-spread glue-down on concrete — full removal
  • Adhesive bond: exceptionally hard — required pre-cutting boards with circular saw before machine extraction
  • Equipment: circular saw + specialized floor removal machine
  • Result: full concrete subfloor exposed, adhesive residue requiring grinding

Subfloor Preparation

  • Adhesive residue removal and high-spot correction: industrial concrete grinding machine
  • Flatness standard: NWFA — maximum 3/16 inch variation over 10-foot span
  • Outcome: within tolerance across full surface, no self-leveling compound required

Acoustic Underlayment

  • HOA requirement: IIC 65 or better (Gallery Condominiums)
  • Material: Roberts Natural Cork, 6mm, panel format
  • Adhesive: Wakol MS 260, notch-troweled onto concrete
  • Coverage: full floor area prior to wood installation

Herringbone Installation

  • Wood: white oak, unfinished, 5 × 20 inches, 4:1 proportion
  • Direction: single consistent direction throughout all rooms
  • Adhesive: Wakol MS 260, full-spread
  • Sequence: center line cured 24 hours before expanding outward
  • Tape: blue painter’s tape across joints during adhesive cure
  • Coverage: living area, dining area, kitchen, hallways, primary bedroom, second bedroom, office, all transitions

Border

  • Width: 7 inches
  • Coverage: all rooms throughout the full residence
  • Joinery: tongue-and-groove — mechanical connection between border and field
  • Corners: 45-degree miter throughout
  • Tool: Milwaukee router for tongue-and-groove profile
  • Special conditions: custom fit at base of floor-level artwork, careful fitting at floor-to-ceiling mirrors

Thresholds

  • Type: custom — small boards in varying grain directions
  • Locations: every doorway in the residence
  • Connection: tongue-and-groove at field edge

Sanding

  • Field cutting and leveling: Lägler Hummel belt sander — grits 40 / 60 / 80
  • Perimeter and tight areas: Super 7 edger — grits 40 / 60 / 80
  • Refining and flattening: FG Floortec Discus planetary sander — grits 100 / 120
  • Standard: full grit progression per NWFA standards

Finishing

  • Coat 1: LOBA Easy Prime sealer
  • Coat 2: LOBA 2K Duo, satin
  • Coat 3: LOBA 2K Duo, satin
  • Application: Roller for field, brush for edges and border
  • Intercoat interval: minimum 3 hours at standard conditions
  • VOC: low — no forced ventilation required
  • Full cure: approximately 7 days

Site Protection

  • Fixed items: wrapped in heavy plastic sheeting and blue tape throughout
  • Floor-to-ceiling mirrors: protected during demolition and border installation
  • Floor-level artwork: floor removed and installed around it in place
  • Post-demolition deep cleaning: provided at no charge before client move-back

HOA and Building Logistics

  • Work hours: 9:00 AM to 4:00 PM, business days only
  • Elevator: reserved in advance for each delivery and debris removal day
  • On-site duration: five weeks

“We had a fantastic experience with Claudiu and Classy Flooring. We live in a Buckhead high-rise condo, and they handled the project seamlessly, including all building and elevator requirements.

The craftsmanship is outstanding. We installed a white oak herringbone floor with a 7-inch tongue-and-groove border, finished on site, and the results are beautiful—truly high-end work with great attention to detail.

Claudio was professional, calm, and a pleasure to work with from start to finish. I would highly recommend Classy Flooring to anyone looking for exceptional quality and a smooth experience.”

Arthur Simons

Buckhead
Google Business review

Related Work

European White Oak Herringbone with Brass Inlay — Woodstock Estate — another custom herringbone installation with a mechanically-locked custom border, where the same routed tongue-and-groove border approach also frames a solid brass inlay across a two-house family estate.

For a large-scale engineered installation with a factory-made herringbone and custom border across two Savannah, GA penthouse residences, see our European Ash Herringbone Installation — Savannah, GA Penthouse Residences project page.

For a custom herringbone installation with a 7-inch tongue-and-groove border in a Monroe, GA residence, see our Monroe Herringbone Installation project page.

For another engineered hardwood project in an Atlanta high-rise condominium — with HOA acoustic underlayment requirements and freight-elevator logistics — see our Engineered Hardwood Replacement at The Atlantic, Atlantic Station project page.

Considering a Custom Pattern Installation in Atlanta?

Classy Flooring ATL specializes in herringbone, chevron, and border installations for premium residential projects across the Atlanta metro area. Every project begins with a site evaluation and a clear conversation about what the floor will require and what the finished result will look like.

View our Custom Pattern Installation page →

See all our projects on our Our Work page →

Contact us to discuss your project→