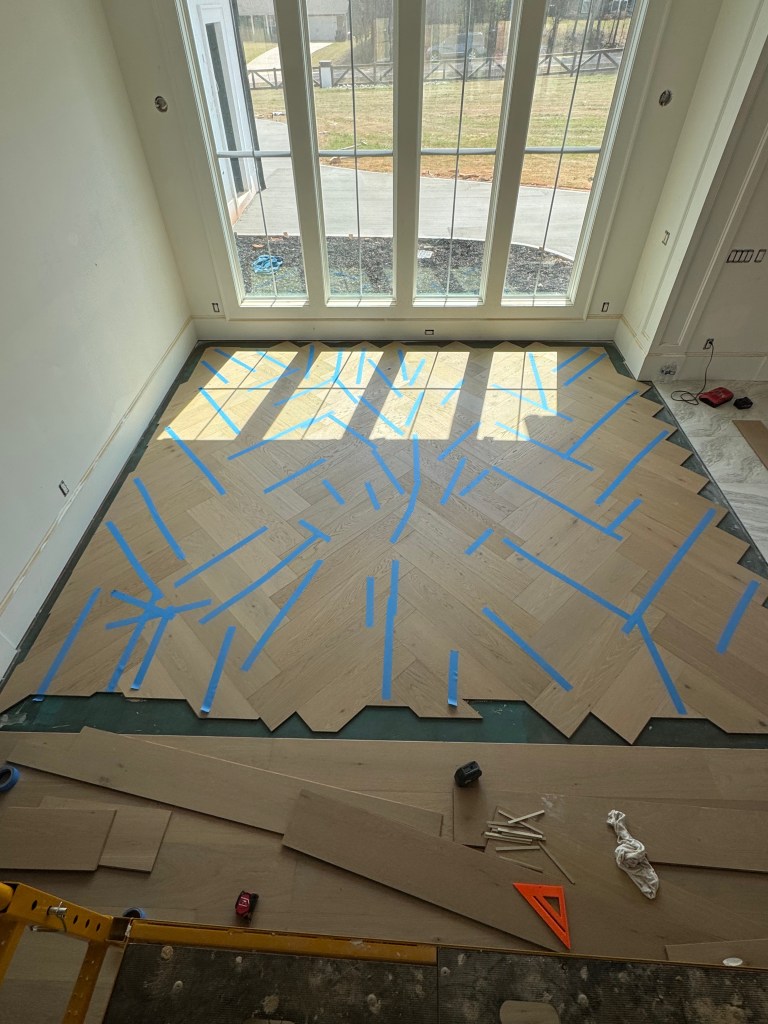
Classy Flooring ATL

Prefinished Engineered White Oak Adapted for Custom Herringbone and Border

This page documents a custom herringbone and border installation completed in Monroe, Georgia in 2026. The material used — prefinished engineered white oak specified for a standard straight layout — was not manufactured for pattern work. Every piece of the herringbone field was fabricated on site from the existing boards. What follows is a full account of the technical decisions made to make the design work.

The Client Situation

The project did not begin as a custom pattern installation. The client originally came to us for a straightforward prefinished engineered white oak installation. As the project developed, the goal for the dining room shifted — the client wanted that space to feel more distinctive and intentional rather than simply continuing the straight-laid flooring throughout the rest of the home. The decision was made to create a herringbone feature with a border that would elevate the dining room while remaining fully integrated with the material already selected for the rest of the project.

The challenge was not only to create the pattern itself, but to make it feel visually connected to the rest of the installation rather than separate from it.

Project Constraints

The central constraint was the material itself. The prefinished engineered white oak had been selected for a straight installation — it was not a product designed or manufactured for custom pattern work. That meant the project was not simply about installing herringbone. It was about adapting a material that was never intended to be used that way and making the result look intentional, clean, and fully connected to the surrounding floor.

The second constraint was proportion and integration. The herringbone area could not read as an add-on. The layout, border dimensions, and transitions between the pattern area and the straight-laid floor all had to be worked out carefully so the finished result felt like part of the original design of the home, not a decorative detail introduced after the fact.

Subfloor conditions also had to be addressed before installation could begin. A custom pattern depends on the foundation being correct — without that, the geometry of the herringbone cannot be maintained across the full area.

The Decisions That Defined the Outcome

The critical decision was committing to doing the pattern correctly rather than forcing a shortcut with a material that was not designed for it. That meant fabricating the pieces to the right dimensions, preparing the subfloor properly, and working out the layout and border integration before installation began — not during it.

If those steps had been handled casually, the herringbone would not have read as balanced, the border would not have felt integrated, and the dining room would have looked like a compromise rather than a custom feature. On a project like this, the difference between a result that holds up and one that merely gets finished is whether the material is adapted with discipline or forced into a pattern it was never manufactured for.

The Constraint

The flooring for this new construction project in Monroe, Georgia was specified as prefinished engineered white oak in a standard straight layout. Installation was already underway in the main living areas when the client decided to add a herringbone pattern with a custom border in the dining room.

The existing material — 9 1/2-inch wide, 5/8-inch thick prefinished engineered white oak with a four-sided micro-bevel — was a glue-down product designed and sized for straight installation. It was not manufactured as a herringbone product. No purpose-built herringbone boards were on site. No factory-cut pattern pieces were available.

The decision was to fabricate the herringbone pieces on site from the existing material — cutting, milling, and recreating the board profile to the dimensions required for a properly proportioned 45-degree pattern — then integrate a tongue-and-groove border using the same prefinished product, with consistent bevel detail throughout.

Project Facts

  • Material: Prefinished engineered white oak, 9 1/2-inch wide, 5/8-inch thick, four-sided micro-bevel, glue-down
  • Herringbone section: Approximately 180 sq ft including border
  • Border: Same prefinished material, single board width (9 1/2 inches), 60 linear feet
  • Pattern angle: 45 degrees
  • Fabricated pieces: Approximately 96 boards milled to 48-inch length
  • Subfloor: Concrete slab
  • Moisture barrier: Wakol PU 280, two coats standard — third coat applied to herringbone zone after 72-hour recoat window was exceeded
  • Adhesive: Wakol MS 260 throughout
  • Property: New construction, approximately 5,500 sq ft, single-family residence
  • Location: Monroe, Georgia
  • Year: 2026

Subfloor Preparation and Moisture Protocol

The concrete subfloor was mechanically ground and vacuumed before any moisture barrier was applied. Moisture was tested prior to application — the reading was 65% relative humidity per ASTM F2170, well within the rated tolerance for Wakol PU 280.

Two coats of Wakol PU 280 were applied to the full installation area. The straight layout in the remainder of the house was installed within the 72-hour recoat window specified by the manufacturer. The herringbone dining room zone was not.

Because the second coat in that zone had exceeded 72 hours before installation was ready to proceed, the surface was scuffed with a 220-grit disc and a third coat of Wakol PU 280 was applied to the herringbone area only — restoring adhesion integrity per manufacturer protocol before any boards were glued down.

Fabrication

Standard herringbone installation uses boards manufactured specifically for pattern work — square-cut ends, consistent length, no bevel on the cut faces. The existing material had none of these characteristics. Each piece had to be fabricated from random-length boards before a single board could be installed.

The fabrication process for each of the approximately 96 herringbone pieces involved three steps. First, boards were cut to a consistent 48-inch length using a miter saw. Second, a groove was milled into the cut end using a router table, creating the tongue-and-groove profile needed for the border connection. Third, the micro-bevel was recreated by hand on the routed edge using a wood block with 180-grit sandpaper — a few controlled passes per edge to match the factory profile on the remaining three sides.

A workshop mock-up was completed before installation began — laying out the herringbone and border pieces to verify proportions, confirm the tongue-and-groove fit, and check visual consistency across the bevel line between field and border.

Layout

The room dimensions were measured and a center line was established using a green laser. The principal layout line was marked on the cured moisture barrier surface. The first row was dry-laid along the laser line to verify equal spacing to the left and right before any adhesive was applied.

The herringbone field was installed at 45 degrees using Wakol MS 260 adhesive. Blue painter’s tape was applied across the field during adhesive cure to hold joints tight and maintain alignment. The field was allowed to cure fully before the border work began.

Establishing the Center Line

The room dimensions were measured and a center line was established using a green laser. The principal layout line was marked directly on the cured moisture barrier surface.

Dry Layout

The first row was dry-laid along the laser line to verify equal spacing to the left and right before any adhesive was applied.

Installation

Once the layout was confirmed, Wakol MS 260 adhesive was spread across the herringbone zone and the fabricated boards were set into the adhesive following the 45-degree pattern, working outward from the center line. Each board was pressed firmly into the adhesive bed and seated flush with its neighbors. The herringbone field was built out in full before any perimeter cuts or border work began.

Blue painter’s tape was applied across the field during adhesive cure to hold joints tight and maintain alignment. The field was allowed to cure fully before the border work began.

Border Integration

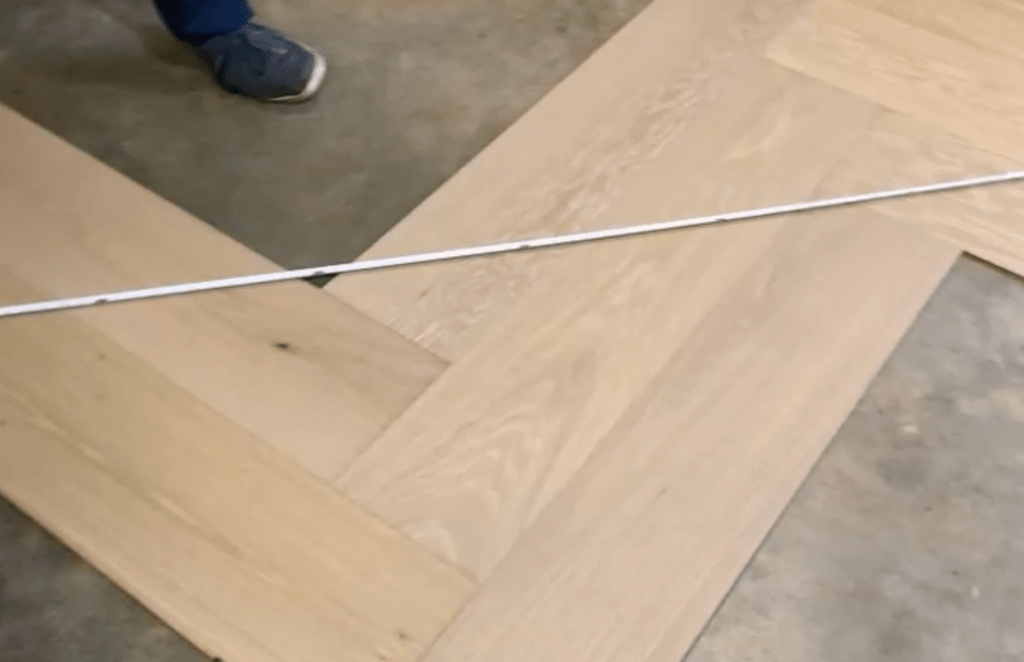
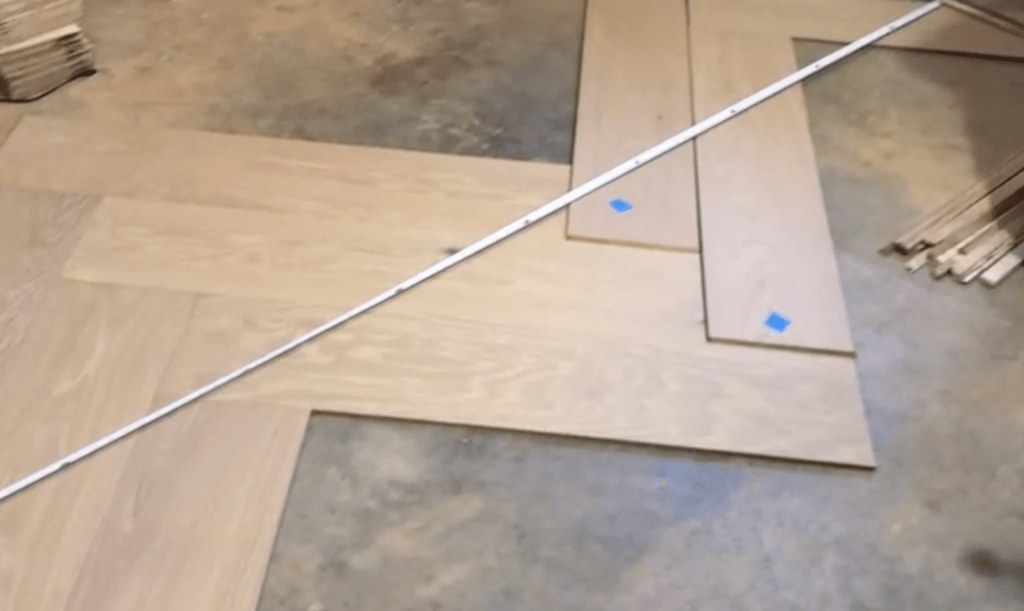
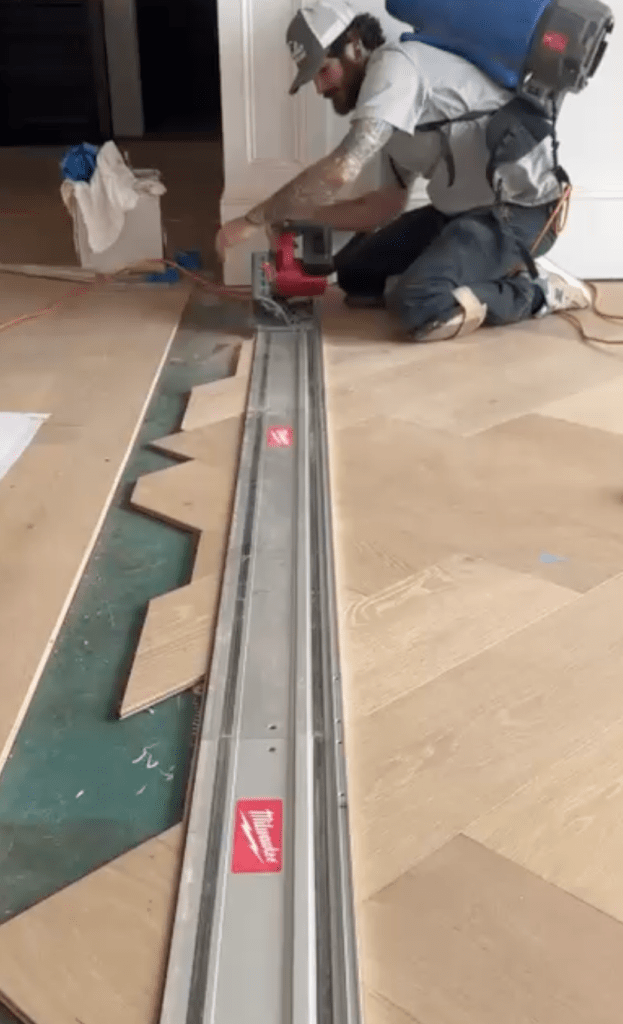
The border channel was cut on the second day. A Milwaukee track saw was used to cut the straight perimeter line through the installed herringbone field — removing the stepped, uneven edge left by the 45-degree pattern and creating a clean, straight channel for the border boards.

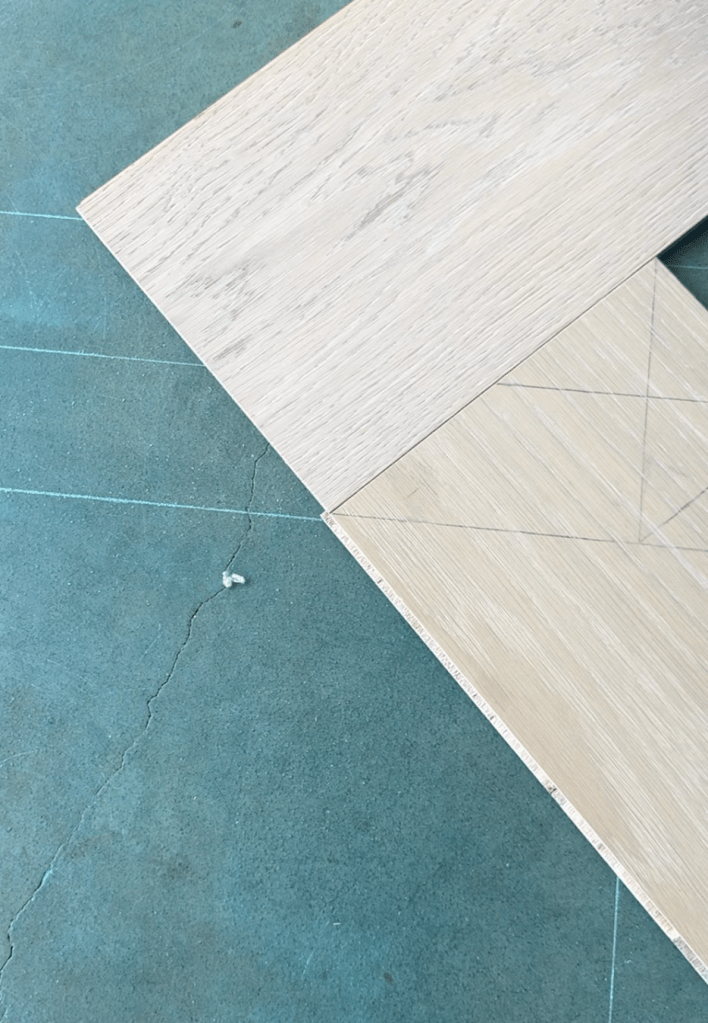
After the excess material was removed, a Milwaukee hand router was used to recreate the groove along the cut edge of the herringbone field. This groove connects to the tongue on the border board, creating a mechanical tongue-and-groove joint between the herringbone section and the border — not a simple butt joint.

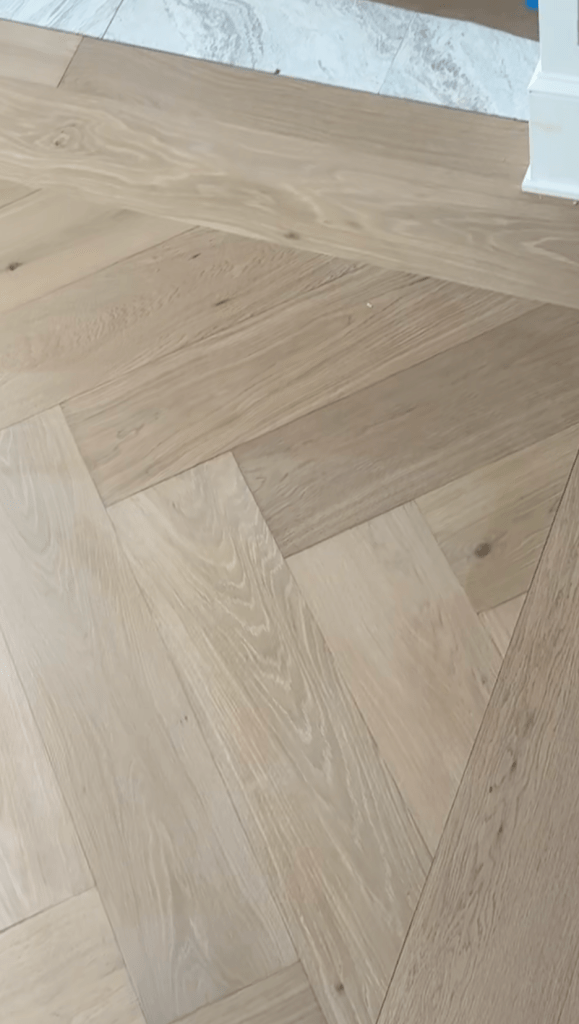
The micro-bevel was then recreated by hand along the exterior edge of the herringbone field using the same 180-grit sanding block method used during fabrication. This ensures the visual bevel line between the herringbone and the border matches the bevel profile across the rest of the floor.

The border boards — cut from the same prefinished white oak, single board width, running the full 60-linear-foot perimeter — were glued down with Wakol MS 260. Corners were butt-joined per the client’s preference. Shims were placed against the baseboards to hold the border down against the adhesive until it set.

Square shoe molding in white prime pine, painted to match the baseboards, was nailed along the perimeter to finish the installation.

The Result

The finished dining room reads as an intentional design feature rather than a workaround. What stands out is the layout, the border, and the consistency of the finished detail — not the fabrication constraint behind it.

Technical Notes

  • Moisture barrier protocol: Wakol PU 280 was scuffed and recoated per manufacturer protocol after the 72-hour recoat window was exceeded — not skipped or worked around.
  • Fabrication method: The groove on each fabricated piece was milled on the router table, not cut freehand — same tool, same depth, consistent result across all 96 pieces.
  • Bevel recreation: The micro-bevel was recreated manually with a wood block and 180-grit paper — a controlled, repeatable process that matched the factory bevel profile on the remaining three sides.
  • Border connection: The tongue-and-groove connection between field and border was used for fit, alignment, and consistency — not as a simple visual treatment.
  • Bevel continuity: The bevel between the herringbone field and the border was recreated to match the original four-sided factory profile — maintaining visual consistency at every joint.
  • Straight-layout continuity: The remainder of the house used the same prefinished engineered white oak product, installed within the manufacturer’s moisture barrier recoat window.

Related Work

This project documents one type of custom adaptation. For custom pattern work using purpose-built material, see the related Buckhead herringbone installation — white oak, 5-inch width, 20-inch length, LOBA 2K Duo finish, high-rise residential. For large-scale prefinished engineered installation with a factory-made herringbone, see the related Savannah penthouse residences — Anderson Tuftex European Ash, factory-made herringbone with custom border, approximately 5,000 square feet across two penthouse residences.

This project documents one type of custom adaptation. For custom pattern work using purpose-built material, see the related Buckhead herringbone installation — white oak, 5-inch width, 20-inch length, LOBA 2K Duo finish, high-rise residential.

To discuss a custom pattern project, contact Classy Flooring ATL.

For more on subfloor preparation, moisture control, flatness correction, and the conditions that must be addressed before hardwood installation begins, see: Subfloor Preparation for Hardwood Installation in Atlanta

“Another masterpiece by Classy Flooring ATL. Just finished installing about 5,000 Sf. of engineered white oak flooring. Classy did an excellent job incorporating a herringbone design in the dinning room to break up the floor. I highly recommend this group and do not see myself entertaining any other company. Quality, cleanliness and attention to details speak for itself. Thank you again Classy Flooring ATL. for surpassing all expectations.”

     — Steven Steven
          Google Business Profile Review
         Project context: Monroe, GA | Engineered Hardwood Installation & Herringbone Feature