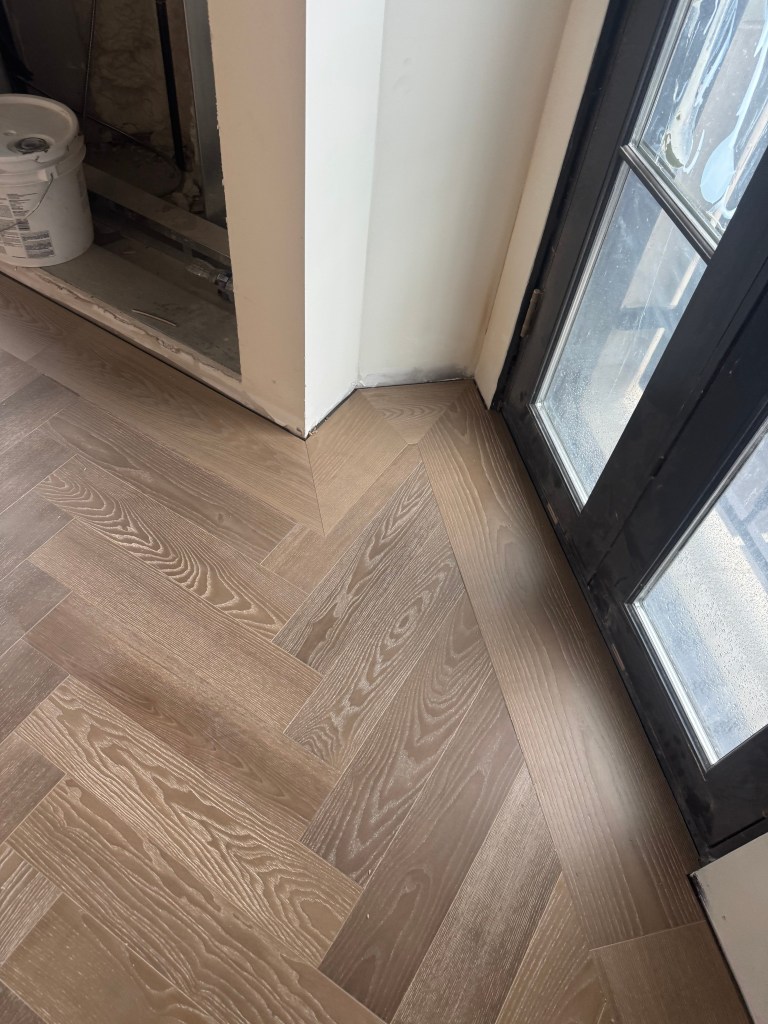
Large-Scale European Ash Herringbone Installation with Custom Border — Savannah, GA Penthouse Residences
Classy Flooring ATL installs large-scale, technically complex hardwood floors and works directly with architects, interior designers, and general contractors to execute their specifications. This project is a clear example: approximately 5,000 square feet of engineered European Ash across two multi-level penthouse residences in Savannah, Georgia, installed between November and December 2025. The main rooms were laid in a factory-made herringbone field with a custom 7-inch picture-frame border, and the hallways in a straight-lay run of the matching plank — both products from the same Anderson Tuftex European Ash line in Ballet, color- and finish-matched so the floor reads continuously across thresholds.
Classy Flooring ATL is based in the Atlanta metro area. We travel for the right complex jobs — projects where the pattern work, the scale, the substrate conditions, and the coordination with a design team call for our level of installation discipline. The Savannah penthouses were one of those projects.
This Savannah penthouse project is one of Classy Flooring ATL’s documented custom pattern installations — large-scale herringbone, custom borders, and design-team collaboration across Georgia and metro Atlanta. See the full range of our work on our Our Work page.
What this project demonstrates
This installation shows four capabilities directly:
- Scale. Approximately 5,000 square feet across two adjoining penthouse residences, completed by a crew of four in roughly three weeks.
- Complexity. A factory-made Anderson Tuftex European Ash herringbone field — ordered in 5-inch by 15-inch pieces — framed by a custom 7-inch picture-frame border in the main rooms, with the matching plank product in a straight lay in the hallways. Installed over two different substrates: concrete on the lower level and plywood on the upper level. The herringbone was glue-down on both levels; the substrates were prepared differently to deliver the flat, sound base the adhesive requires.
- Collaboration with the design team. The interior designer selected the flooring — the manufacturer’s factory-made herringbone for the main rooms and the matching plank for the straight-lay hallways. The project architect specified the adhesive. Classy Flooring ATL executed that specification across both residences.
- Installation to specification. We installed precisely to the design team’s product, pattern, and adhesive decisions, assessed each substrate against manufacturer tolerances before starting, and communicated clearly with the general contractor when a substrate needed correction before flooring could go down.
Project overview
Two adjoining penthouse residences shared the building’s third floor. Each residence was internally two-story: a lower level built on a concrete slab, and an upper level built over a plywood subfloor. The combined scope was approximately 5,000 square feet — roughly 3,000 in the larger residence and 2,000 in the second.
The main rooms were installed using Anderson Tuftex European Ash Herringbone in Ballet (AA846-17060), factory-made and ordered in 5-inch by 15-inch herringbone pieces, framed by a custom 7-inch picture-frame border. The hallways on each level were installed in a straight lay using the matching plank product from the same line, Anderson Tuftex European Ash in Ballet (AA845-17060). Both products share the wire-brushed finish in the Ballet color, so the herringbone field and the straight-lay hallways read continuously across thresholds. The flooring was selected by the project’s interior designer; the adhesive, a moisture-barrier urethane, was specified by the project architect. Classy Flooring ATL provided the installation, executing the design team’s specification across both residences.
A crew of four worked the project over approximately three weeks. The building provided a freight elevator and stair access for material movement; floor and surface protection was managed on site throughout.
Working with architects, designers, and general contractors
Classy Flooring ATL works as the hardwood installation specialist on projects led by architects, interior designers, and general contractors. On a project like this, the design team makes the design decisions — material, finish, pattern, adhesive — and Classy Flooring ATL is responsible for installing that specification correctly, flagging anything that needs to be resolved first, and delivering a result that holds up.
On the Savannah penthouses, that division of responsibility was clear:
- The interior designer selected the flooring: Anderson Tuftex European Ash Herringbone in Ballet (AA846-17060) for the main rooms and the matching plank, Anderson Tuftex European Ash in Ballet (AA845-17060), for the straight-lay hallways.
- The architect specified the adhesive: a moisture-barrier urethane.
- The general contractor coordinated the site and the trades, including the substrate correction described below.
- Classy Flooring ATL assessed each substrate against the manufacturer’s installation requirements, advised the general contractor where the concrete slab needed leveling before flooring, and installed the herringbone field, the custom border, and the straight-lay hallways to the design team’s specification across both residences.
This is how we work on large projects: we install to the specification we’re given, we measure the substrate against the standards that specification depends on, and we raise issues early — to the right party — rather than installing over a problem.
Substrate preparation
A flat, sound substrate is a manufacturer condition for glue-down engineered hardwood, not a preference, and a herringbone field with a custom border telegraphs every dip and high spot beneath it. The two levels of each residence presented two different substrates, each requiring its own preparation before any flooring went down.
Lower level — concrete slab
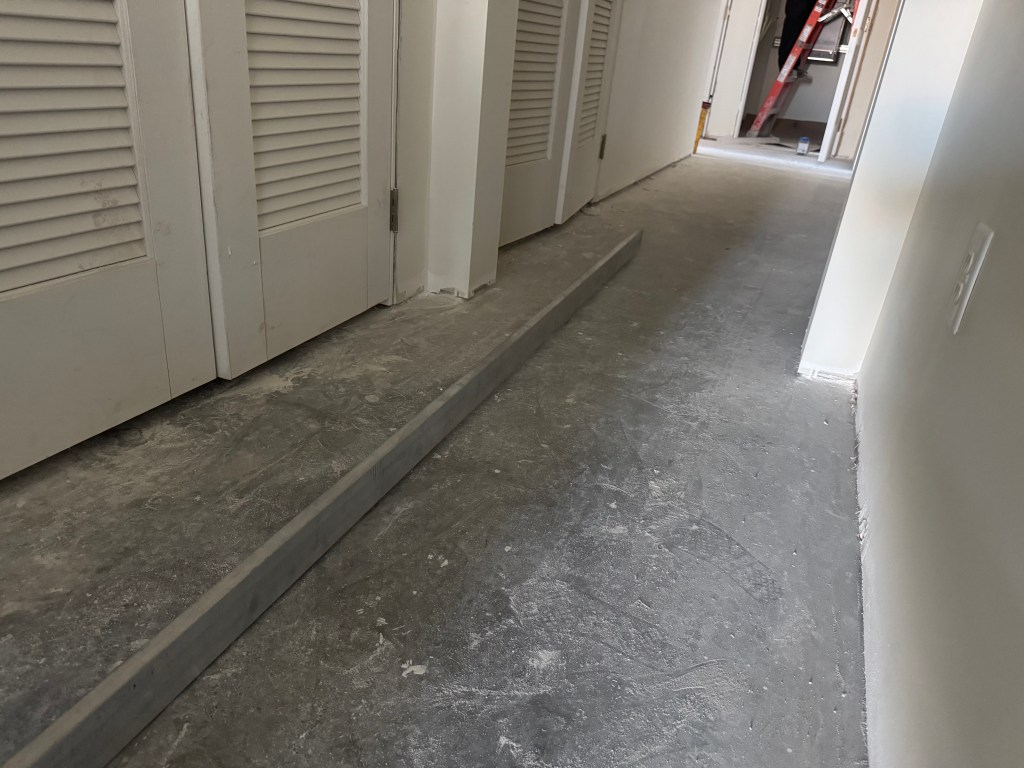
Before installation, Classy Flooring ATL assessed the lower-level concrete slab against the flatness tolerance required for glue-down engineered hardwood: 1/8 inch over 6 feet and 3/16 inch over 10 feet. The slab fell outside that tolerance. We documented the condition and advised the general contractor, who engaged a specialized concrete leveling contractor to grind the high spots and pour self-leveling compound across the level. Installation proceeded once the slab met specification.
Slab moisture was tested prior to installation and was within range to proceed; the urethane adhesive specified by the architect also carries an integrated moisture barrier.
Upper level — plywood subfloor
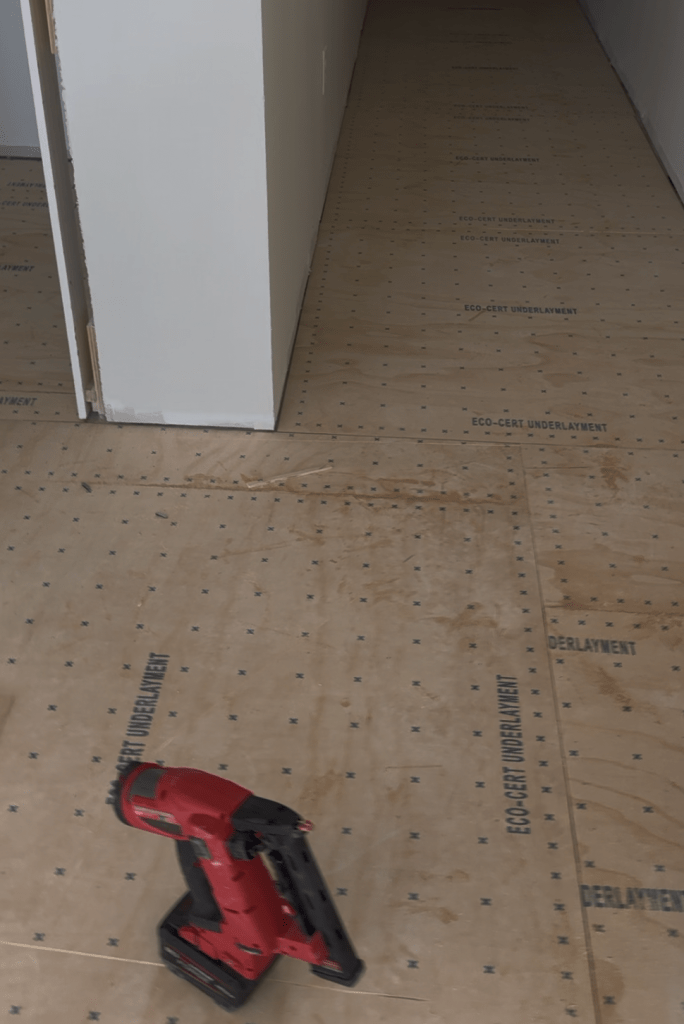
On the upper level, following the general contractor’s and architect’s direction, Classy Flooring ATL installed an additional 1/4-inch plywood layer over the existing plywood subfloor. Its purpose was to provide a flat, sound surface for the adhesive — not a nailing base — since the herringbone field was a glue-down installation on both levels. The overlay was fastened on a close pattern across the floor to lock it flat and eliminate any movement under the adhesive.
Pattern installation
The herringbone field was a glue-down installation on both levels. The substrates were prepared differently to deliver the flat, sound base the adhesive requires — leveled concrete on the lower level, a quarter-inch plywood overlay on the upper level — but the installation method, the working sequence, and the adhesive itself were the same throughout. Across both residences the build sequence ran in the same order: lay out the working lines, build the field, then frame it with the custom border.
Laying out the working lines
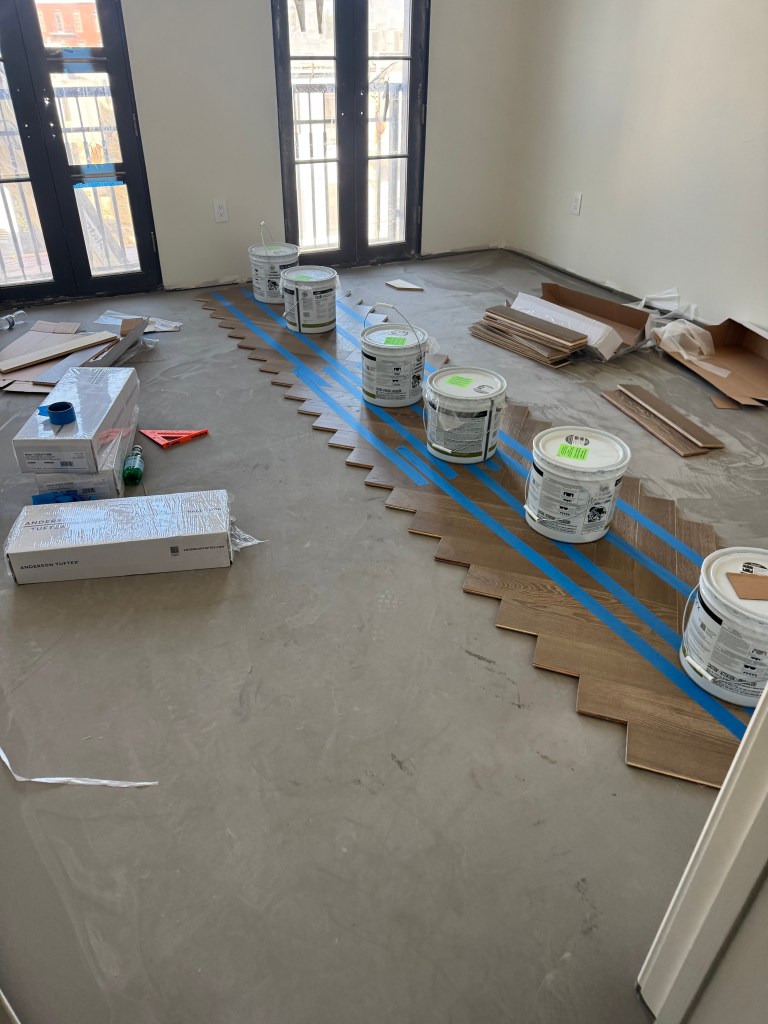
A herringbone field is only as accurate as the lines it is built from. Before any board went down, the layout was established with snapped chalk lines and taped reference lines across the floor. On a large, open space, these lines are what hold the pattern’s geometry across the room — a small angular error at the starting point compounds with every course, so by the time the field reaches the opposite wall the points will no longer line up and the border cannot land square. Each room was lined out first, and the field was worked off those lines rather than off a wall, so the pattern stays square to the lines rather than following the room’s out-of-square.
Building the field into troweled adhesive
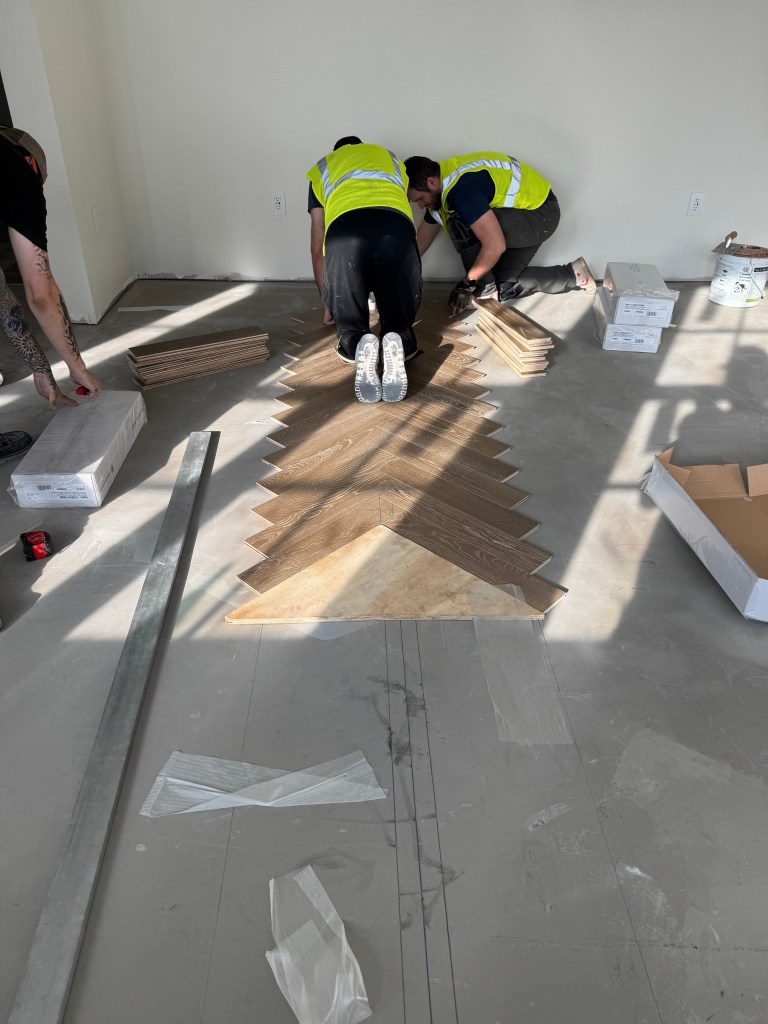
The field was set into a full-spread, troweled urethane adhesive — the combed ridges of the trowel visible on the substrate ahead of the leading edge. Each factory-made 5-inch by 15-inch herringbone piece was placed into wet adhesive and seated against its neighbors so the bond develops across the full underside of the piece, not at isolated points. The pattern builds out from the working lines course by course, with the blocks engaging tightly so no gaps open between the points.
Advancing the field across the room
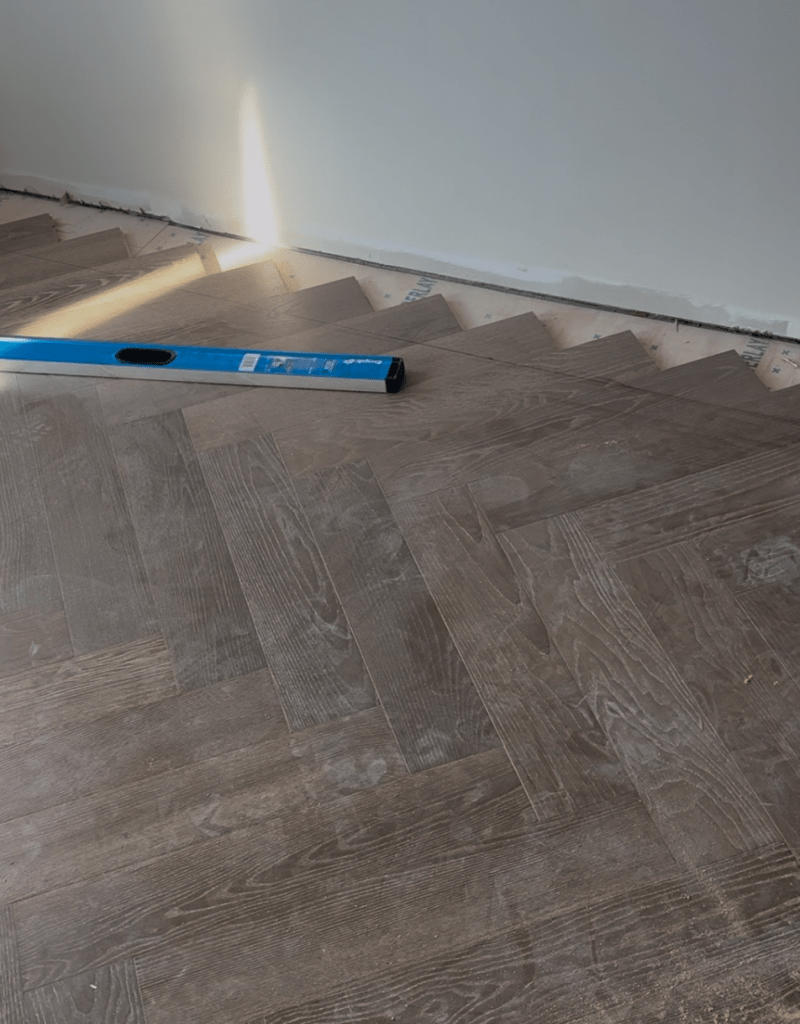
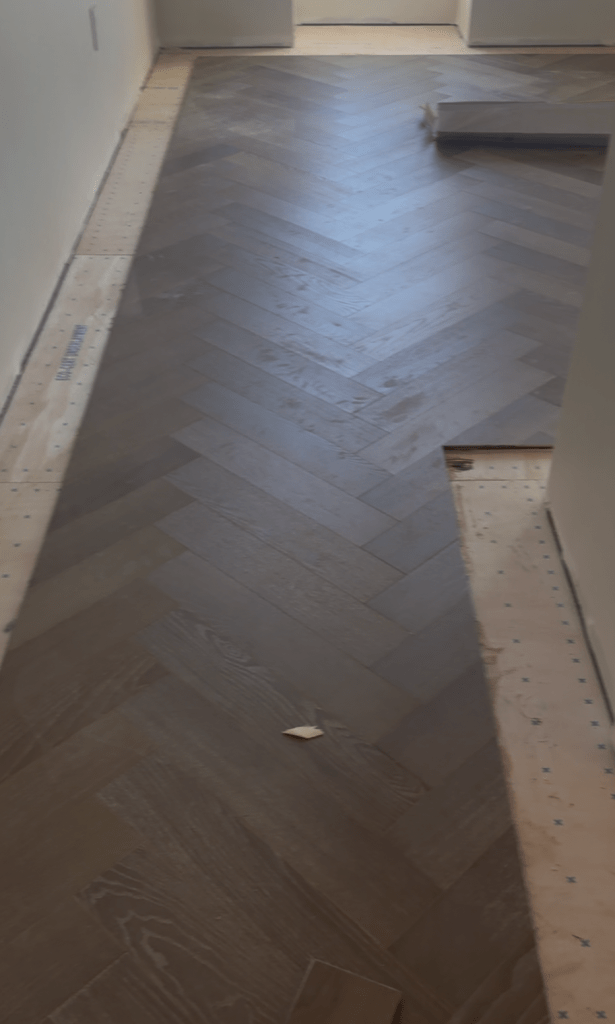
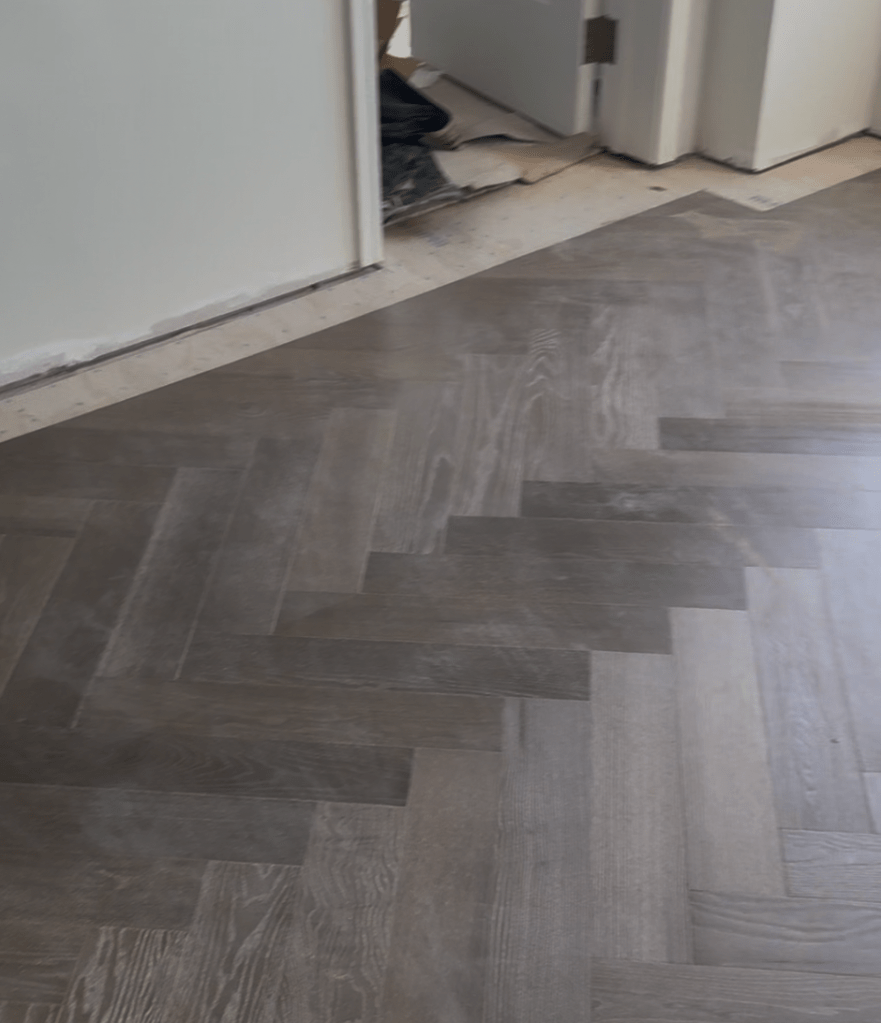
As the field grows, its leading edge reads as the characteristic zig-zag of a herringbone pattern — each course stepping off the last. The field is carried across the full room and fitted precisely to whatever it meets along the way: doorways, thresholds, and built-in details. Where the floor runs up against a fixed element, the blocks are cut to follow the line exactly rather than leaving a gap to be filled later.
Reserving the perimeter for the border
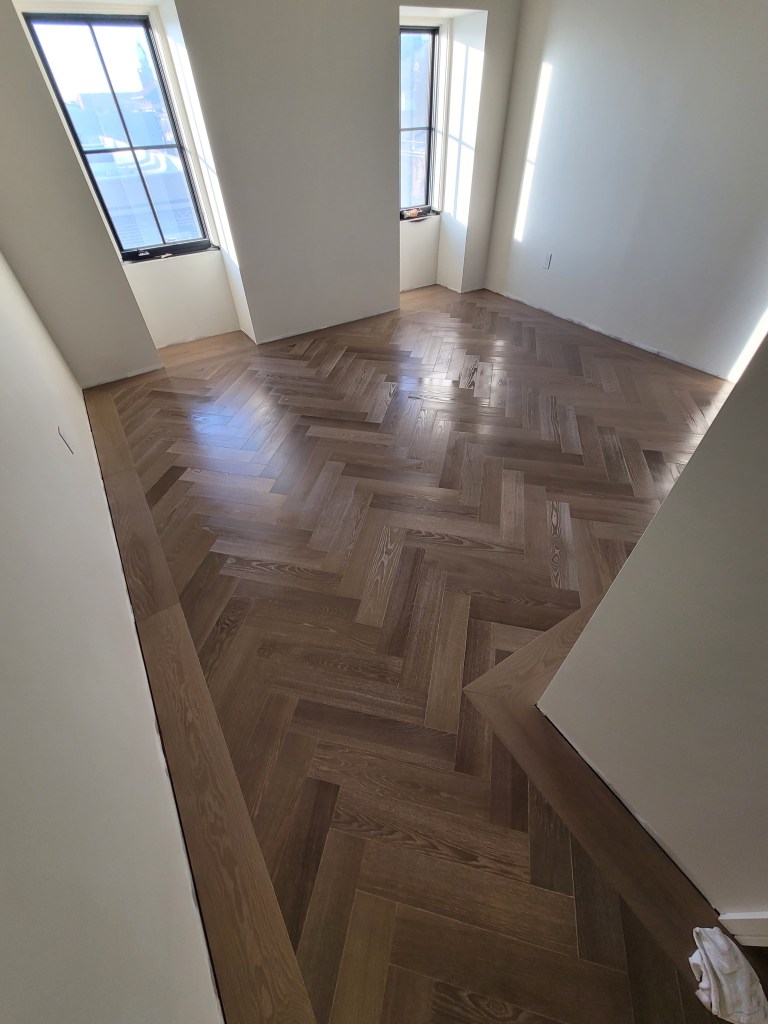
The herringbone field is installed first and held back from the walls, leaving a consistent margin around the perimeter of each room. That margin is reserved for the custom 7-inch border, which is fitted after the field is complete. Installing the field first and setting the border last allows the border to be scribed to the walls and mitered at the corners, framing the finished pattern and squaring it to the room.
Setting the custom border
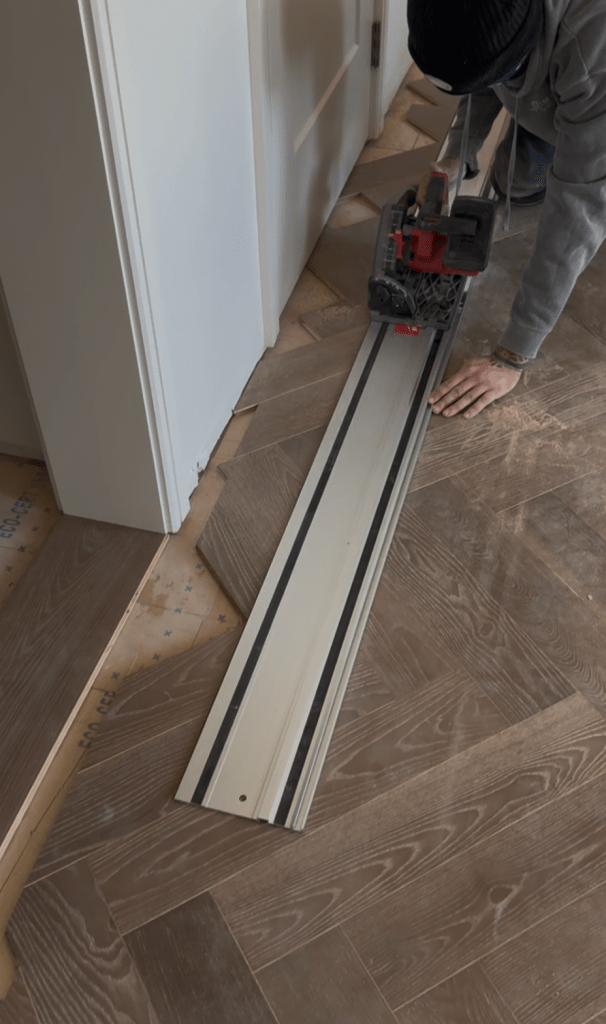
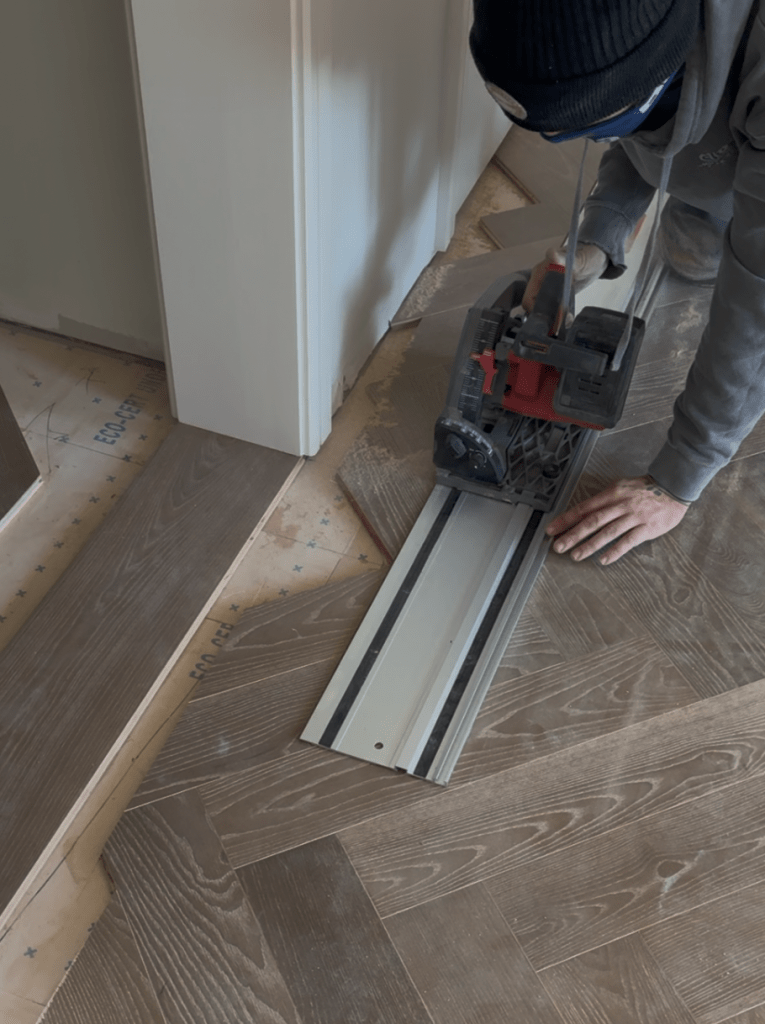
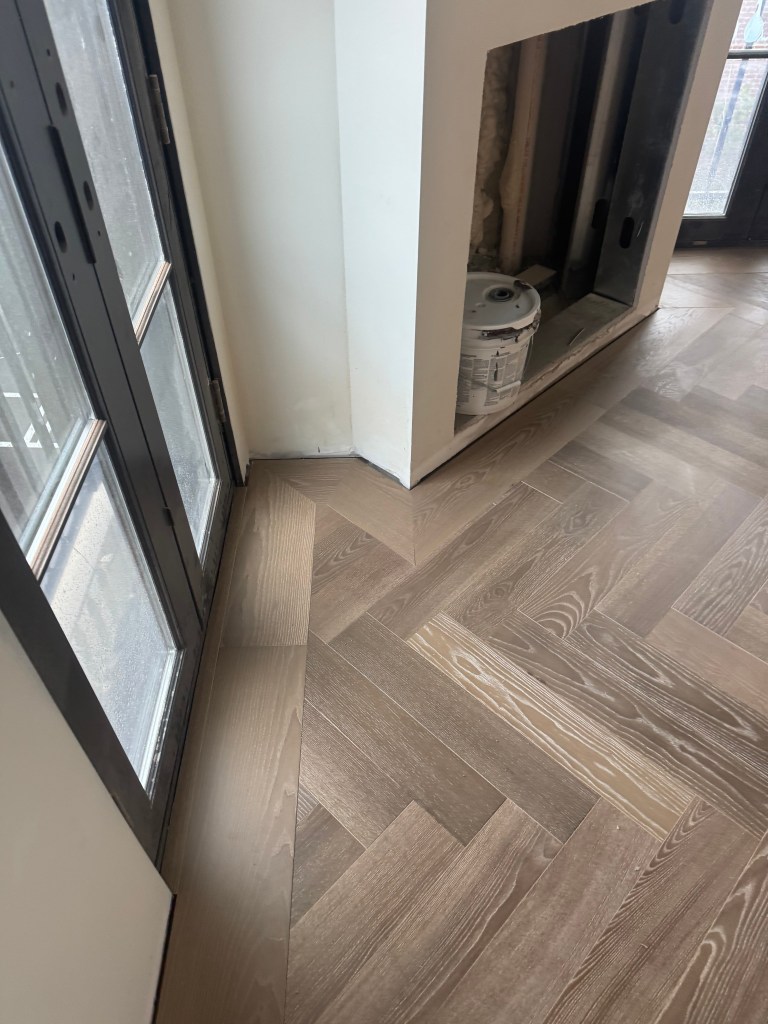
With the field complete, the border is fitted around the perimeter as a picture frame. The connection between the two is the part that matters. Instead of butting the border against the herringbone, the field edge was cut on a track saw and the border was routed to a tongue-and-groove joint, so the border and the field engage along a machined profile.
A glued butt seam relies only on the adhesive holding two square edges together; with seasonal movement and foot traffic, that kind of joint is where a floor first opens up or steps out of plane. A tongue-and-groove joint mechanically locks the border to the field — the two pieces hold the same height and stay tight to each other even as the floor expands and contracts. On a herringbone field framed by a border, that joint is also what keeps the transition line straight, so the border reads as a clean frame rather than a seam following the field.
Hallways and transitions
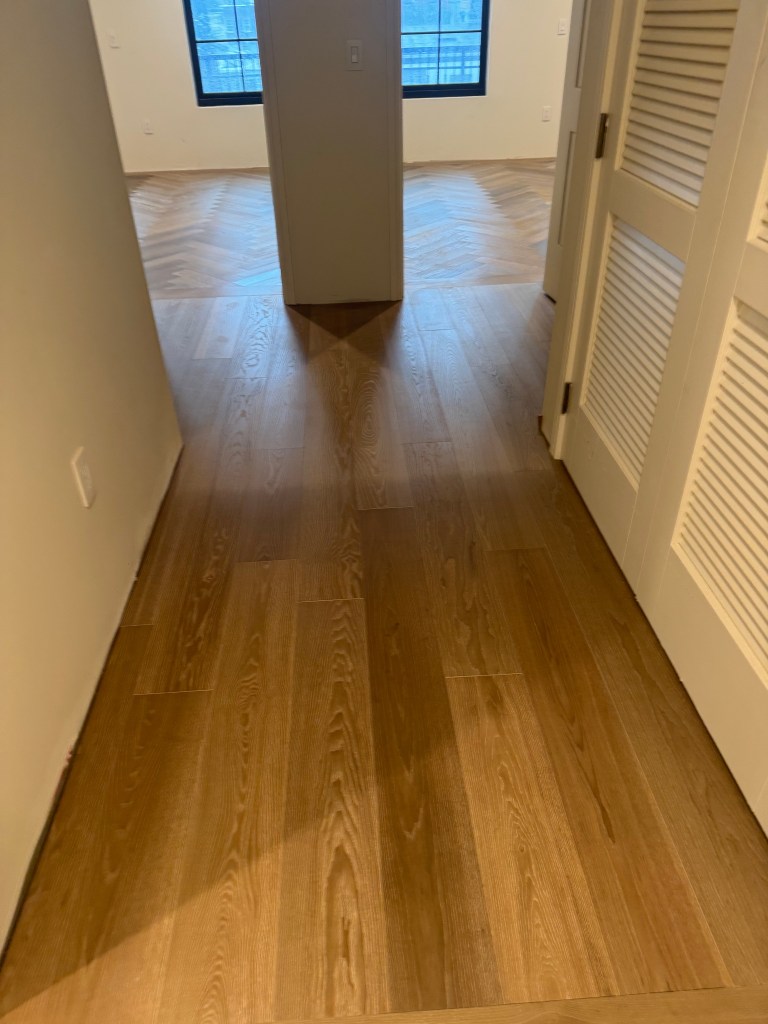
In the hallways on both levels, the flooring transitions from the herringbone field to a straight lay. The straight-lay runs use the matching plank product from the same Anderson Tuftex European Ash line in Ballet, with the boards laid in line with the corridor. Because the two products share color and finish, the floor reads continuously across the threshold; the border resolves the field on each side, and the straight-lay carries the floor through the hallway without a material break.
Finished result
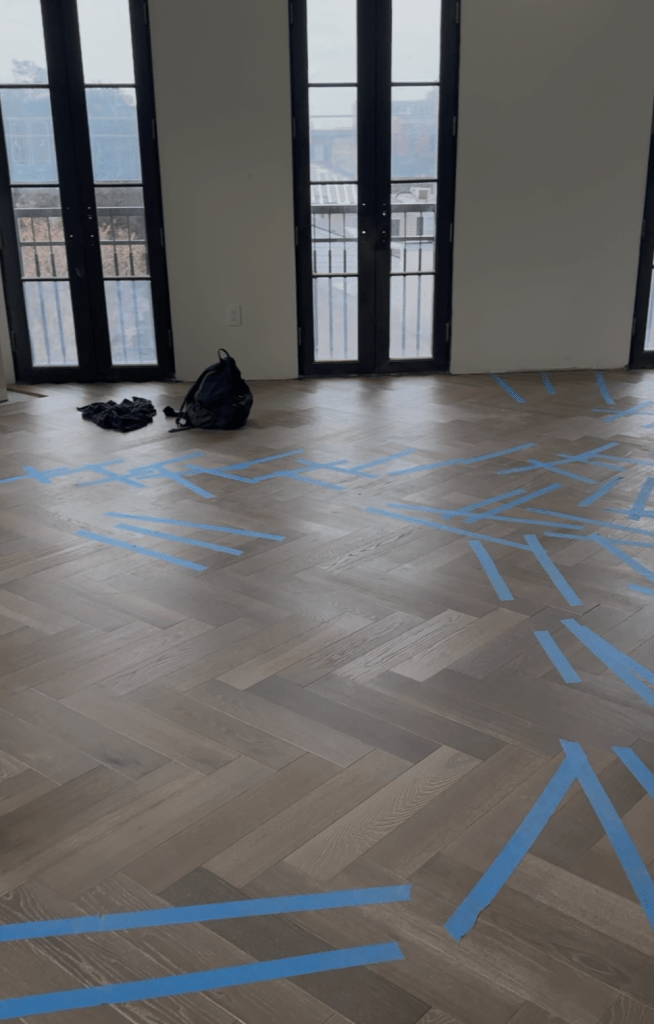
The completed floor reads as a continuous European Ash surface in Ballet, with the wire-brushed grain and low-sheen finish catching light across the open rooms. The herringbone field is held inside its custom 7-inch frame in each room; the straight-lay hallways carry the floor between rooms in the matching plank from the same line. Across approximately 5,000 square feet and two residences, the herringbone geometry stays consistent, the borders square to the rooms, and the transitions between the herringbone field and the straight-lay runs hold flat at the threshold.
Custom border detail
The border is a 7-inch band run around the perimeter of each room, framing the herringbone field. It serves two functions. First, it resolves the pattern: a herringbone field ends in angled points, and running those points directly into a wall leaves a ragged, hard-to-fit edge. The border gives the field a straight, square line to terminate against, so the perimeter reads clean instead of as a row of cut points. Second, it absorbs the room’s out-of-square. No room is built perfectly rectangular; the border is scribed to the actual walls, taking up the variation in its width so the herringbone field itself stays square to its working lines.
The connection between the border and the field is a tongue-and-groove joint, not a butt seam. The field edge was cut on a track saw and the border was routed to engage it along a profiled edge. A butt seam holds two square edges together with adhesive alone, which is where a floor tends to open or step out of plane with seasonal movement. The tongue-and-groove joint indexes the two pieces to the same height and keeps them mechanically locked as the floor expands and contracts, so the frame line stays flat and tight.
Project specifications
| Specification | Detail |
|---|---|
| Project type | Large-scale engineered hardwood installation |
| Location | Savannah, Georgia |
| Completed | November–December 2025 |
| Scope | Two penthouse residences, ~5,000 sq ft total (~3,000 + ~2,000) |
| Material — herringbone field | Anderson Tuftex European Ash Herringbone in Ballet, AA846-17060 |
| Herringbone format | Factory-made, ordered in 5 in × 15 in herringbone pieces |
| Color and finish | Both products produced in Ballet, with matched wire-brushed finish, micro-bevel, and UV aluminum oxide surface |
| Construction | Engineered, prefinished (both products) |
| Material — straight-lay hallways | Anderson Tuftex European Ash plank in Ballet, AA845-17060 |
| Plank width (straight-lay) | 7.48 in |
| Plank thickness | 5/8 in (15.9 mm) |
| Plank lengths | Random, 19.68–74.8 in |
| Pattern | Factory-made herringbone field in the main rooms, straight-lay plank in the hallways, framed by a custom 7-inch border |
| Border | Custom 7-in picture-frame border |
| Field-to-border joint | Track-saw cut field edge, border routed to a tongue-and-groove profile |
| Hallways | Straight lay |
| Adhesive | Shaw TotalWorx LokWorx 35 MC (moisture-barrier urethane) |
| Installation method | Glue-down on both levels |
| Substrate — lower level | Concrete slab, leveled to manufacturer flatness tolerance before installation |
| Substrate — upper level | Existing plywood subfloor with added 1/4-in plywood overlay |
| Crew | 4 |
| Duration | ~3 weeks |
| Material selected by | Project interior designer |
| Adhesive specified by | Project architect |
| Role of Classy Flooring ATL | Substrate assessment and installation to architect’s and designer’s specification |
Frequently asked questions
Does Classy Flooring ATL install to an architect’s or designer’s specification?
Yes. Classy Flooring ATL regularly works as the hardwood installation specialist on projects led by architects, interior designers, and general contractors. On the Savannah penthouse project, the interior designer selected the flooring — Anderson Tuftex European Ash Herringbone in Ballet (AA846-17060) for the main rooms and the matching plank (AA845-17060) for the straight-lay hallways — and the architect specified the adhesive. Classy Flooring ATL installed both products and the custom border across two residences to that specification. We install to the specification we are given, measure the substrate against the standards it depends on, and raise any issues early with the right party.
Can Classy Flooring ATL handle large, complex flooring projects?
Yes. This project covered approximately 5,000 square feet of factory-made herringbone with a custom 7-inch border across two multi-level penthouse residences, installed over two different substrates, by a crew of four in roughly three weeks. Classy Flooring ATL specializes in large-scale, technically complex hardwood installations, including custom pattern work, borders, and engineered installation over both concrete and plywood subfloors.
Can engineered hardwood be installed in a herringbone pattern over both concrete and plywood?
Yes. Engineered herringbone is suited to glue-down installation over either substrate, provided the substrate is flat, sound, and within the manufacturer’s moisture tolerance. On this project, the herringbone was a full glue-down on both levels. The lower level was installed over a concrete slab that was first leveled to the manufacturer’s flatness tolerance; the upper level was installed over an added 1/4-inch plywood overlay, fastened on a close pattern over the existing subfloor to deliver the flat, sound base the adhesive requires.
Why does a concrete slab have to be leveled before installing a herringbone floor?
A glue-down engineered hardwood installation requires a substrate flat to within 1/8 inch over 6 feet and 3/16 inch over 10 feet. A herringbone pattern compounds the cost of any deviation: every block references its neighbors, so a dip or high spot in the slab will telegraph through the pattern and the perimeter border, opening points and breaking the geometry of the field. On the Savannah project, Classy Flooring ATL assessed the slab against that tolerance before installation, advised the general contractor where it fell outside the spec, and installed only once a leveling contractor had brought the slab to specification.
Does a herringbone floor need a border, and how is the border installed?
A herringbone floor does not require a border, but a border solves a problem the pattern creates. A herringbone field terminates in angled points; running those points directly into a wall leaves a ragged edge that is hard to scribe and reads as cut-off rather than finished. A border gives the field a straight, square line to terminate against, and it absorbs the room’s out-of-square along its width so the herringbone field itself stays square to its working lines. On this project, the field was installed first and held back from the walls; the custom 7-inch border was set last. The field edge was cut on a track saw and the border was routed to a tongue-and-groove profile, so the two engage along a machined edge rather than meeting at a butt seam. The tongue-and-groove joint indexes the two pieces to the same height and keeps them mechanically locked as the floor expands and contracts.
Why use engineered herringbone instead of solid wood for a large project?
Engineered hardwood is built with a hardwood wear layer over a multi-layer core. The cross-grain construction of the core reduces seasonal expansion and contraction relative to a solid hardwood block of the same dimension. On a large herringbone field with a custom border, that dimensional stability matters: every block references its neighbors, and the more the material moves with humidity, the more visible the joints become at the points and along the border line. Engineered herringbone also accepts glue-down installation over concrete, which solid herringbone often does not. Both products on this project — the AA846 herringbone and the AA845 plank — are engineered.
How long does an installation of this size take?
This project covered approximately 5,000 square feet of factory-made herringbone with a custom border across two multi-level residences. A crew of four completed it in roughly three weeks, including substrate preparation. Timelines vary with substrate condition, pattern complexity, and site access; a factory-made herringbone with a site-built border is significantly slower per square foot than a straight-lay installation because of the cutting and layout work the pattern requires.
Does Classy Flooring ATL take projects outside the Atlanta area?
Classy Flooring ATL is based in the Atlanta metro area and most of our work is in and around Atlanta. We travel for the right complex jobs — large-scale or technically demanding projects like this Savannah penthouse installation — where the pattern, scale, and installation work fit what we specialize in.
Related projects
This project shares its pattern, border work, and engineered-installation approach with two of our documented Georgia projects:
- Monroe, GA — prefinished engineered white oak herringbone with a custom border.
- Chateau Elan, Braselton, GA — engineered white oak glue-down installation over a concrete slab.
- See all of our completed hardwood projects on our Our Work page →
- Woodstock, GA — European white oak herringbone with a solid brass inlay across a two-house estate.
About this project
This large-scale engineered hardwood installation was completed by Classy Flooring ATL, a premium hardwood flooring company based in the Atlanta metro area, with specialized experience in herringbone, custom borders, and engineered hardwood installation over both concrete and plywood substrates. Classy Flooring ATL works directly with architects, interior designers, and general contractors, installing precisely to their specifications on large and technically complex projects.
Planning a large or complex hardwood project, or specifying flooring for a client? Contact Classy Flooring ATL to discuss the scope.