

If you are planning a herringbone floor on a concrete slab in Atlanta, subfloor flatness is one of the first things that needs to be evaluated — before material selection, before layout planning, before anything else. It is a primary installation requirement, and herringbone is less forgiving of subfloor deviation than straight plank in ways that directly affect the finished result.
The quick answer
NWFA’s flatness tolerance for a glue-down wood floor over concrete is 3/16 inch in 10 feet, or 1/8 inch in 6 feet, unless the flooring manufacturer specifies otherwise, and NWFA’s 2025 guidelines hold parquet patterns, herringbone included, to the same tolerance. For herringbone, meeting that baseline matters even more: the boards meet at an angle and the pattern runs uninterrupted, so any variation registers along the points. If the slab is out of tolerance, high spots are ground and low spots filled before installation begins. We measure every subfloor before a herringbone job starts and correct what we find before the flooring is installed.
Why herringbone is less forgiving than straight plank
In a straight plank installation, boards run parallel in one direction. A minor subfloor deviation affects one area locally and is difficult to track across the full field because there is no repeating geometric reference.
Herringbone works differently. The pattern is built from a precise repeating geometry: every piece meets its neighbors at an angle, and every V across the floor references the same working lines and the same unit dimensions. Because each piece references the pieces around it, a dip or high spot in the subfloor telegraphs through the pattern and opens the points.
Hardwood Floors Magazine, in a technical article by Bob Goldstein — NWFA Certified Wood Flooring Inspector and Certified Installation Professional — states this directly: ornamental floors including herringbone require a very flat subfloor, and “once a herringbone or chevron pattern starts to run off due to the subfloor, you are in a real world of hurt.”
In the finished floor, inadequate flatness shows in two ways: pieces sit at slightly different heights, so the joints show lippage, and the points of the pattern open where the subfloor dips or rises. On a prefinished glue-down floor there is no sanding pass after installation, so the factory finish makes any height difference at the joints visible from the start.
The Monroe project — what concrete prep actually involved
The Monroe project was a new construction home in Monroe, Georgia: 180 square feet of prefinished engineered white oak herringbone at 45 degrees, border included, glued to a concrete slab with WAKOL MS 260.
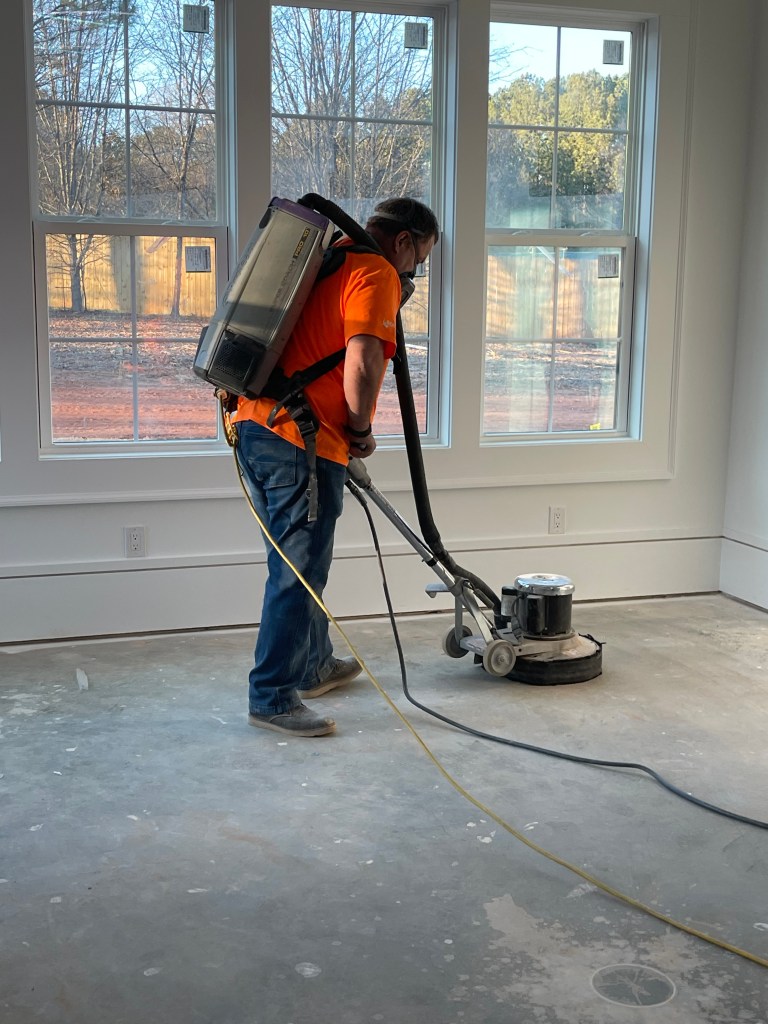
The general contractor had prepared the slab well, and it did not need self-leveling. Before any flooring work began, we measured the slab and confirmed it was within NWFA’s tolerance. We then ground the surface — less for flatness than to open the pores of the concrete so the moisture barrier could bond. A smooth steel-troweled surface resists penetration; grinding creates the mechanical profile the moisture barrier needs.
Moisture was tested before the barrier was applied, with in-situ relative humidity probes per ASTM F2170. The slab read 65% — under the 80% above which NWFA calls for waiting or installing a Class I vapor retarder, and under WAKOL MS 260’s own 80% limit. NWFA recommends a Class I retarder over concrete on or below grade regardless of the reading; under a glue-down, NWFA has the adhesive manufacturer set the moisture limits and the moisture control, and the retarder has to be compatible with the adhesive.
Two coats of WAKOL PU 280 were applied across the installation area; WAKOL rates two coats to 98% relative humidity, and above that, WAKOL evaluates the slab first. WAKOL’s data sheet gives a cure of about 24 hours depending on humidity and calls for the flooring to be installed within 72 hours after the PU 280 cures. The herringbone dining room was added mid-project, and by the time it was ready, the second coat in that zone had cured more than 72 hours earlier. The surface there was scuffed with a 220-grit disc and a third coat of PU 280 applied, so the MS 260 adhesive bonded to a fresh PU 280 surface inside WAKOL’s window.
Flatness and moisture are prepared as one system. A flat slab still needs its moisture tested and managed, and a dry slab still needs to be flat for the herringbone to read cleanly.
You can see the full Monroe project — including the 45-degree layout and the integrated border on a concrete slab — documented here: Monroe prefinished engineered herringbone installation
The concrete prep sequence for a herringbone glue-down installation
Measure first.
We assess the slab with a straightedge before anything else, identifying the high spots and the low spots. NWFA’s tolerance for a glue-down floor over concrete — 3/16 inch in 10 feet, or 1/8 inch in 6 feet — is the benchmark, unless the flooring manufacturer specifies otherwise. A slab outside that tolerance is corrected before installation: high spots are ground first, and low spots are filled after the moisture barrier is applied.
Grind.
On concrete slabs, grinding serves two purposes: bringing high spots into tolerance, and opening the surface pores for moisture barrier adhesion. On the Monroe slab, flatness was already acceptable — grinding was done for surface profile, not flatness correction. On slabs with high spots, grinding addresses both simultaneously. In the Buckhead high-rise herringbone, grinding alone brought the slab within NWFA’s tolerance, with no self-leveling compound.
Apply moisture barrier.
The slab’s moisture is tested first; NWFA calls for testing every concrete slab, including where the adhesive manufacturer says testing isn’t required, and we test with in-situ relative humidity probes per ASTM F2170. NWFA recommends a Class I vapor retarder over concrete on or below grade, and when the slab reads above 80% relative humidity, calls for waiting or installing a Class I retarder per the adhesive manufacturer. Under a glue-down, NWFA has the adhesive manufacturer set the moisture limits and the moisture control, and the retarder has to be compatible with the adhesive. WAKOL PU 280 is then applied by roller: two coats on concrete, which WAKOL rates to 98% relative humidity; above that, WAKOL evaluates the slab first. Each coat cures in about 24 hours, depending on humidity, and where the adhesive is applied directly to the PU 280, the flooring is installed within 72 hours after it cures. When that window passes, we scuff the surface and apply a fresh coat, as on the Monroe herringbone.
Fill low spots if needed.
Where low spots exceed tolerance, they are filled with a patching or self-leveling compound compatible with the adhesive system and primed as its manufacturer directs. NWFA’s guidelines for concrete are to grind the high areas, fill the low areas, and do the filling after the slab’s moisture has been tested. With the WAKOL system we use, the primer is applied on the cured PU 280, the self-leveling compound over the primer, and the flooring adhesive directly on the cured compound; our post on how to level a concrete floor for hardwood covers the primer, the pour thickness and the drying times. In the Savannah penthouse residences, the lower-level slab fell outside tolerance; Classy Flooring ATL checked it with a straightedge, and the general contractor’s crew leveled it before the herringbone was installed. The Monroe slab needed no fill.
Install within the confirmed system.
The adhesive is applied once the moisture barrier is confirmed intact; WAKOL MS 260 can be applied directly over cured PU 280, or over the cured compound where the slab was leveled. The herringbone layout then begins from working lines set through the room, on a subfloor confirmed flat, clean, dry, and primed.
Why this matters for the pattern specifically
NWFA’s 2025 guidelines hold herringbone to the same flatness tolerance as any glue-down floor: 3/16 inch in 10 feet, or 1/8 inch in 6 feet. What changes is how a variation reads. Straight plank runs in one direction and carries minor subfloor variation more easily; in herringbone, every piece references the pattern geometry of the pieces around it, so a variation shows at the points. Some herringbone manufacturers specify a tighter tolerance — NWFA’s ornamental floors guide notes 1/8 inch in 10 feet from some of them — and when the product’s instructions call for it, that tighter number governs.
This is why we treat slab evaluation as part of the herringbone planning process: a job-specific assessment that determines what preparation the project actually requires.
Over a plywood subfloor, NWFA’s guidelines hold herringbone to the same tolerance. Our guide to what kind of subfloor hardwood floors need covers panel thickness, gluing, and overlays for wood subfloors.
For more on how herringbone installation planning works from the beginning — including layout direction, border decisions, and perimeter conditions — see our article Should a Herringbone Floor Have a Border?
If you are planning a herringbone floor on a concrete slab in Atlanta
Concrete slab preparation for herringbone in Atlanta-area homes involves evaluation, grinding, moisture management, and tolerance confirmation before installation begins. What your specific slab requires depends on its condition — new construction slabs and existing slabs present different starting points. How we prepare concrete slabs, and how that work is priced, is on our subfloor preparation service page.
We assess every concrete subfloor before any custom hardwood pattern installation begins. If you are planning a herringbone installation in Atlanta and want to understand what your slab preparation will involve, contact us here. You can also see our full approach to custom pattern work on our custom hardwood pattern installation in Atlanta page.
Classy Flooring ATL is led by Claudiu Toma, an NWFA Certified Installer, NWFA Certified Sand & Finisher and NWFA Certified Sales Advisor, who completed NWFA Precision Patterns: Parquet Flooring and NWFA Precision Patterns: Medallions. Every project is carried out by our in-house crew.
Frequently asked questions
How to fix herringbone flooring?
Find the cause first, then repair the pieces. NWFA’s guidelines trace most problems on a glued herringbone floor to a few sources: moisture coming up from the slab, which cups or lifts the wood; a subfloor that isn’t flat, which shows as height differences at the joints and open points; and the installation itself — early foot traffic, the wrong trowel or adhesive, poor adhesive transfer, or adhesive that skinned over before the wood was set. Once the cause is corrected, loose pieces are lifted, the old adhesive is cleaned off, and the pieces are re-bonded or replaced; NWFA calls for replacement wood within 2% moisture content of the existing floor. On a site-finished floor, the repaired area is then sanded and finished with the rest. On the Monroe herringbone, the slab was measured, ground, tested at 65% relative humidity, and given two coats of WAKOL PU 280 before installation, which addresses the moisture and flatness causes at the start.
How to fix gaps in herringbone flooring?
First, decide whether the gaps are seasonal. Wood gives up moisture in the dry months and the boards shrink, and NWFA treats seasonal gaps as normal: they close again when humidity returns. NWFA advises against filling seasonal gaps in the dry season, because the wood swells back against the filler and crushes its edges. Holding the house at 30–50% relative humidity and 60–80°F, NWFA’s range when the flooring manufacturer doesn’t give one, limits the movement. Gaps that stay open year-round on a glue-down floor point to the installation — early traffic, the trowel, adhesive transfer, or adhesive that skinned over — and the affected pieces are re-bonded or replaced. On a herringbone floor with a border, the joint between field and border is where movement shows first, which is why the borders on our herringbone floors, such as the Savannah penthouses, are joined to the field with a routed tongue-and-groove that keeps the frame line tight as the floor expands and contracts.
What is the best flooring to put directly on concrete?
For a wood floor, glued-down hardwood, engineered or solid. NWFA’s guidelines allow engineered flooring on, above, or below grade, and solid flooring on or above grade only unless the manufacturer allows otherwise. Whatever goes on the slab, the slab is tested for moisture first and held to NWFA’s flatness tolerance of 3/16 inch in 10 feet or 1/8 inch in 6 feet. NWFA recommends a Class I vapor retarder over concrete on or below grade; under a glue-down, NWFA has the adhesive manufacturer set the moisture limits and the moisture control. The Monroe herringbone is engineered herringbone glued to concrete over two coats of WAKOL PU 280, which WAKOL rates to 98% relative humidity; above that, WAKOL evaluates the slab first. The lower level of the Savannah penthouses is also engineered herringbone glued to concrete, and in the Buckhead high-rise, 24 floors up, solid white oak was glued over cork on the slab.