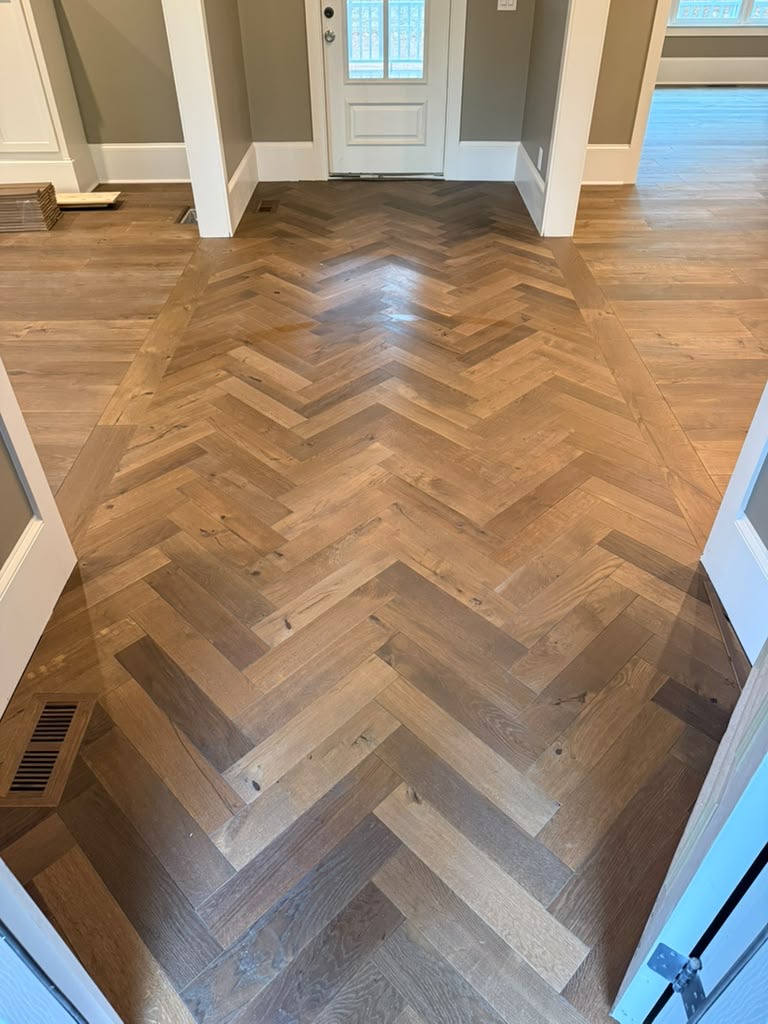
Engineered Herringbone Entrance, Fabricated From Wide Plank — Dunwoody, GA
Yes, you can have a herringbone entrance even when the floor running through the rest of the house is straight, wide plank. On this Dunwoody project, the builder had already installed a 9-inch prefinished engineered hardwood throughout the home, and the owner wanted herringbone in the entrance hallway. There was no factory herringbone made from that exact floor. So we fabricated it from the builder’s own plank in our shop, then matched the new herringbone pieces to the floor they joined.
This page documents how that was done, from bare subfloor to finished entrance.
This Dunwoody entrance is one of Classy Flooring ATL’s documented custom pattern installations — herringbone fabricated and color-matched on site to integrate with an existing floor, part of our pattern and border work across metro Atlanta. See the full range of our work on our Our Work page.
About this project
A roughly 130-square-foot entrance hallway in Dunwoody, Georgia. The home was already floored in a 9-inch prefinished engineered plank, and the entrance needed to read as part of that same floor while standing apart as a herringbone. We handled the fabrication and the installation in-house — one day fabricating the pieces in our shop, then one day installing on site, with a two-person crew. This is the kind of work covered on our Custom Pattern Installation page; if you’re weighing something similar, you can reach us through our Contact page.
Starting point: bare subfloor and a working line
We prepped the entrance to a clean plywood subfloor and snapped a centerline down the length of the hallway. Every piece in a herringbone field is set in reference to that line. A true, straight working line is what keeps the pattern square and symmetrical from the first course all the way out to the border, so the layout line is struck and checked before any flooring goes down.
The entrance prepped to bare plywood with a centerline
snapped down the hallway — the working line the entire herringbone field is set off of.
Fabrication: making herringbone from a 9-inch plank
The builder’s plank was 9 inches wide with a 4 mm wear layer. We ripped it down to 4¼-inch herringbone pieces, re-milled a tongue and groove on the new edges, and recreated the beveled edge so the fabricated pieces matched the profile of the factory plank. The 4 mm wear layer made this material a good candidate for fabrication. It gave us enough real wood at the surface to recreate the bevel and finish the newly cut edges cleanly, without exposing an unfinished core at the face. Thinner engineered products often will not take this kind of re-machining, so the material has to be inspected before we’d commit to the approach.
We also fabricated a tongue-and-groove border to frame the field, milled from the same plank.
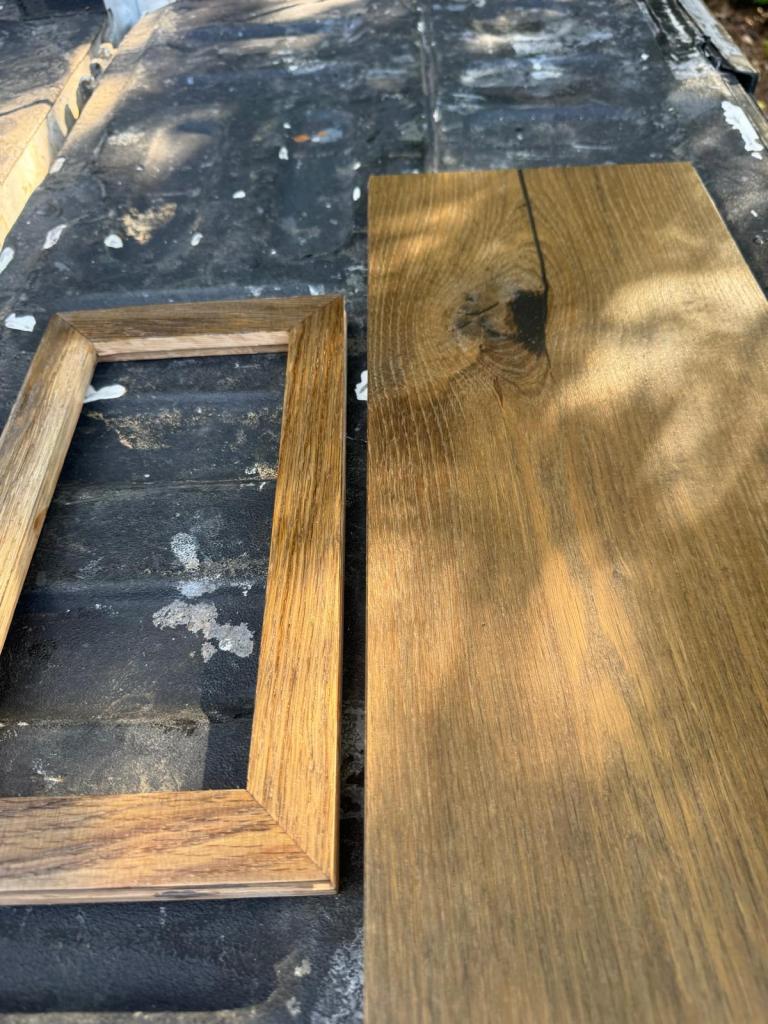
A fabricated tongue-and-groove border corner beside a field plank, after the fumed reactive treatment and Super White oil color match.
Color-matching the cut edges
When the pieces came off the saw, the raw cut edges and new bevels did not match the prefinished factory face. We toned those edges with Rubio Monocoat Fumed, a reactive treatment, then sealed and color-matched them with Rubio Monocoat Oil Plus 2C in Super White. Only the cut edges and bevels were treated — the factory face was left untouched. We sampled the match and had it approved before committing it across the whole hallway.
Setting out and installing the field
We set the first courses out from the centerline and dry-laid pieces ahead of the field to confirm the pattern before fastening anything down.
The field was installed as a nail-assisted glue-down over the plywood subfloor: a full-spread bed of Mapei Ultrabond ECO 980 with mechanical fasteners set as each course went in. The adhesive holds the field flat across the floor; the fasteners hold each piece in position while the adhesive cures.
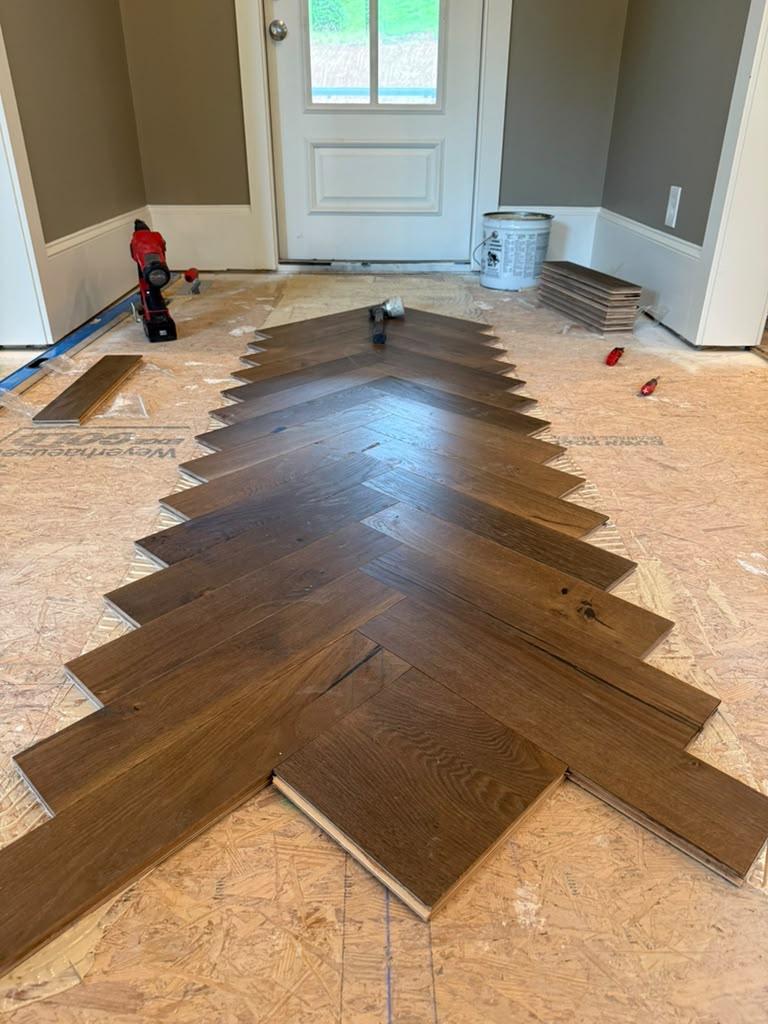
The first courses of herringbone going down off the snapped centerline, with re-milled pieces dry-laid ahead of the field.
The herringbone field going down over a full-spread troweled adhesive bed on plywood, fastened as it sets.
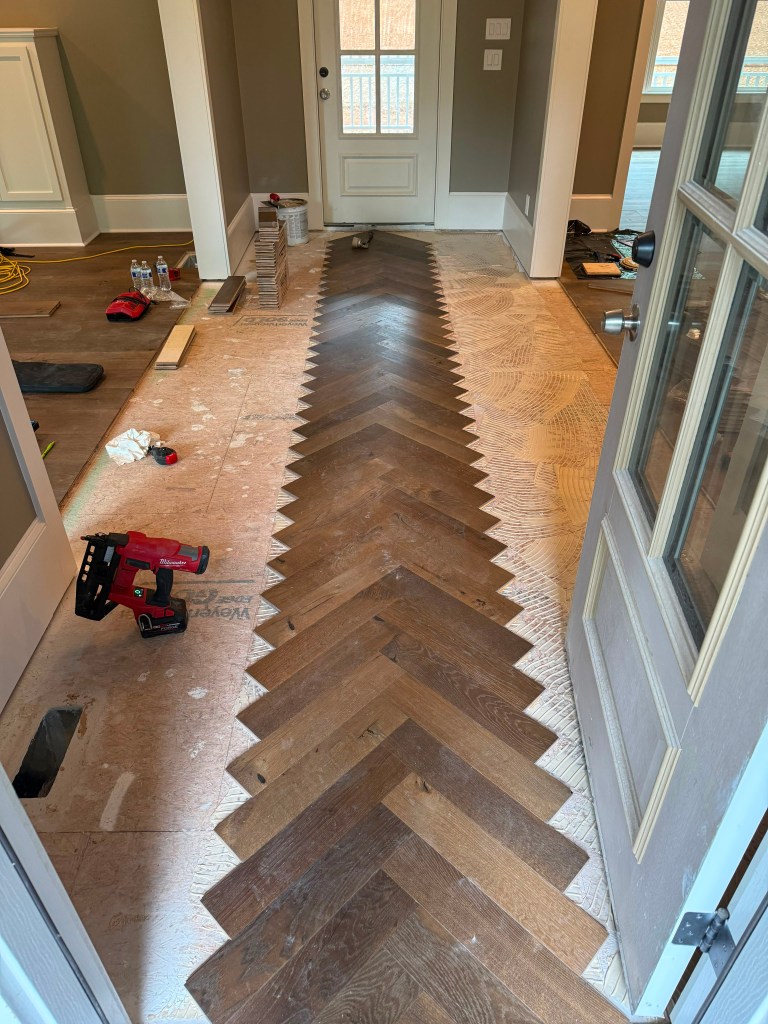
The full herringbone field laid out along the hallway during install, with troweled adhesive on the plywood and a vent opening framed into the floor.
The herringbone field taking shape in the entrance, with re-milled pieces staged for the next courses ahead of the border.
The border and the transition to the straight-run floor
Where the herringbone meets the home’s existing straight-run engineered floor, we ran the fabricated tongue-and-groove border around the field. The border does two things: it frames the pattern, and it gives a milled edge for the straight-run boards to butt against, rather than a raw cut line at the junction.
Flush-mount vents, color-matched to the floor
We supplied 12 vents in raw white oak and color-matched each one to the floor on site, rather than buying pre-finished registers and hoping they came close. Starting from raw wood means the vent takes the same color treatment as the floor it sits in, so the match is built rather than approximated. Each vent is flush-mount — set down inside the opening, level with the surface — instead of a metal register dropped on top of the finished floor.
On a herringbone floor that detail carries more weight than usual. The whole point of the pattern is an unbroken field of angled wood, and a row of contrasting registers cutting through it pulls the eye straight to them. Raw white oak, color-matched and set flush, keeps the vents quiet — they read as part of the floor rather than as hardware sitting on it, so the herringbone stays the thing you see.
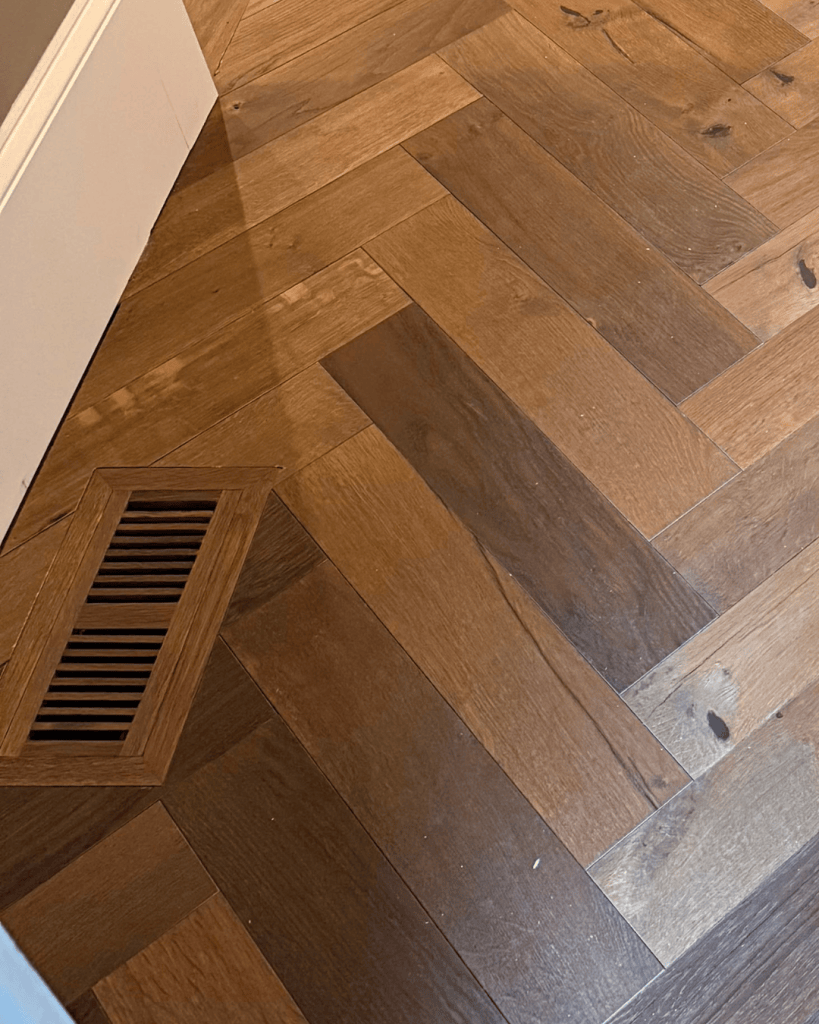
A flush-mount vent built from raw white oak and color-matched on site to the floor it sits in.
A color-matched white oak vent set flush into the herringbone field, sitting level with the floor rather than on top of it.
Finished entrance
The finished entrance reads as herringbone made for the home, not added onto it. The 4¼-inch pieces — ripped and re-milled from the builder’s own 9-inch plank — carry the same color and grain as the floor running through the rest of the house, because they came from it. Where the pattern meets the existing straight-run floor, the fabricated tongue-and-groove border closes the junction with a clean, milled edge rather than a row of cut ends.
The fabricated edges hold their match to the factory face. Because only the cut edges and bevels were toned with the Rubio Monocoat Fumed and Super White, and the factory surface was left untouched, the field reads as one continuous floor rather than a patch set into it. That match was sampled and approved before we committed it across the hallway, so the result was confirmed before it was permanent.
The finished entrance in fabricated 4¼-inch engineered herringbone, with the existing straight-run field continuing beyond.
The completed herringbone field framed by a fabricated tongue-and-groove border, with a color-matched flush-mount vent set into the floor.
The finished entrance herringbone with its fabricated border on both sides and a flush-mount vent color-matched to the floor.
Project specifications
Project type: Custom herringbone entrance, fabricated from wide engineered plank
Location: Dunwoody, Georgia
Area: ~130 sq ft (entrance hallway)
Pattern: Herringbone with a fabricated tongue-and-groove border
Installation: Nail-assisted glue-down over plywood subfloor
Adhesive: Mapei Ultrabond ECO 980
Edge color match: Rubio Monocoat Fumed (reactive) + Rubio Monocoat Oil Plus 2C, Super White — cut edges and bevels only; factory face untouched
Floor vents: 12 flush-mount white oak vents, color-matched
Timeline: 1 day shop fabrication + 1 day on-site installation
Crew: 2
Frequently asked questions
Can a herringbone floor be made from regular wide engineered plank?
Yes. On this Dunwoody project the home was floored in a 9-inch prefinished engineered plank, and the entrance needed herringbone. We ripped that same plank down to 4¼-inch pieces, re-milled the tongue and groove, and recreated the beveled edges so the fabricated pieces matched the factory product. It only works when the plank has enough usable wear layer to re-machine.
Does engineered hardwood need a certain wear layer to be cut and re-milled this way?
It needs enough real wood at the surface to recreate the bevel and finish the cut edges cleanly, without exposing an unfinished core at the face. This plank had a 4 mm wear layer, which made it a good candidate. A thinner wear layer, such as around 2 mm, usually is not — there may not be enough usable surface material to re-machine the edges, so each product has to be inspected before deciding whether this approach will work.
Is herringbone glued or nailed, and over what subfloor?
On this job we used a nail-assisted glue-down over a plywood subfloor — a full-spread bed of Mapei Ultrabond ECO 980 with mechanical fasteners set as the field went down. The adhesive holds the field flat; the fasteners hold each piece while the adhesive cures.
How do you join a herringbone field to the existing straight-run floor?
We fabricated a tongue-and-groove border and ran it around the herringbone where it meets the home’s existing straight-run floor. The border frames the pattern and gives a milled edge for the straight-run boards to butt against, instead of a raw cut line.
Does a herringbone entry like this need a border?
A border is not required, but it solves a real problem here. It gives the herringbone field a clean, milled perimeter where it meets the straight-run floor, and it handles the junction between the two patterns. On this entrance we fabricated the border from the same plank so it matched the rest of the floor.
Do you install custom herringbone in Dunwoody and metro Atlanta?
Yes. Classy Flooring ATL installs custom hardwood patterns — herringbone, chevron, and custom borders — across Dunwoody and the greater Atlanta area, including fabrication work like this when the material was not made for the pattern.
Most of the herringbone work we do starts the same way: someone has a floor they like, or a builder’s plank already down, and a space they want to set apart — an entrance, a dining room, a landing. That’s the work on this page. We install herringbone, chevron, and custom borders across Dunwoody and the greater Atlanta area, including fabrication like this when the material was never made for the pattern. You can see other finished projects in our gallery, or explore our other flooring services.
If you’re considering something similar, we’ll look at the floor, the subfloor, and the material first, and tell you honestly whether the pattern is workable, how we’d approach it, and where the limits are — before any commitment. Get in touch.